Discover various methods and tools for attaching fly line to backing in this comprehensive fly fishing guide. Follow the steps and tips provided to ensure a secure connection, and learn how to troubleshoot common issues that may arise during the process.
Methods for Attaching Fly Line to Backing
Nail Knot
The Nail Knot is a classic and reliable method for attaching fly line to backing. It involves using a nail or a knot tool to create a tight connection between the two. To tie a Nail Knot, follow these steps:
- Take the end of the backing and fold it over the fly line, creating an overlap of about 6 inches.
- Insert the nail or knot tool between the fly line and the backing, about 2 inches from the end.
- Wrap the backing around both the nail and the fly line, making 5-7 tight wraps.
- Remove the nail or knot tool and thread the tag end of the backing through the loop created between the wraps and the fly line.
- Moisten the knot with water or saliva and pull it tight, ensuring that the wraps are snug against the fly line.
- Trim the tag end of the backing close to the knot.
Loop-to-Loop Connection
The Loop-to-Loop Connection is a quick and convenient method for attaching fly line to backing. It involves creating a loop in both the fly line and the backing, and then connecting them together. To make a Loop-to-Loop Connection, follow these steps:
- Create a loop in the end of the fly line by folding it back on itself and securing it with a Surgeon’s Loop or a Bimini Twist.
- Create a loop in the end of the backing using a Double Surgeon’s Loop or a Perfection Loop.
- Pass the loop of the backing through the loop of the fly line, making sure that the loops are aligned.
- Pull the backing loop tight, cinching it securely to the fly line loop.
- Repeat the process on the other end of the backing to attach it to the reel.
Albright Knot
The Albright Knot is a versatile knot that can be used to attach different types of lines together, including fly line and backing. It creates a strong and smooth connection. To tie an Albright Knot, follow these steps:
- Double the end of the fly line and overlap it with the end of the backing.
- Create a loop with the doubled fly line and hold it with your thumb and forefinger.
- Wrap the backing around the loop and the fly line for about 10 turns.
- Pass the end of the backing through the loop created by the wraps.
- Moisten the knot with water or saliva and pull it tight, making sure that the wraps are snug and the backing is secure.
- Trim the tag end of the backing close to the knot.
Double Uni Knot
The Double Uni Knot is a reliable knot that can be used to attach fly line to backing. It is easy to tie and provides a strong connection. To tie a Double Uni Knot, follow these :

- Overlap the end of the fly line and the backing for about 6 inches.
- Create a loop with the end of the fly line and hold it with your thumb and forefinger.
- Take the end of the backing and pass it through the loop of the fly line.
- Wrap the backing around both lines for about 4-6 turns.
- Pass the end of the backing through the loop created by the wraps.
- Repeat the process with the tag end of the fly line and the backing, but this time wrap the fly line around the backing.
- Moisten the knot with water or saliva and pull it tight, ensuring that both knots are snug and secure.
- Trim the tag ends close to the knots.
Backing Barrel Knot
The Backing Barrel Knot is a simple and effective method for attaching fly line to backing. It forms a compact knot that is less likely to snag on the rod guides. To tie a Backing Barrel Knot, follow these steps:
- Double the end of the backing and create a loop.
- Pass the end of the backing through the loop.
- Wrap the tag end of the backing around the standing line for about 10 turns.
- Pass the tag end of the backing through the loop created by the wraps.
- Moisten the knot with water or saliva and pull it tight, ensuring that the wraps are snug and the backing is secure.
- Trim the tag end of the backing close to the knot.
Remember, each of these methods has its advantages and disadvantages, so it’s important to choose the one that suits your needs and preferences. Practice tying these knots before heading out on your fishing trip to ensure a secure and reliable connection between your fly line and backing.
Tools Required for Attaching Fly Line to Backing
Nail Knot Tool
A Nail Knot Tool is a handy tool that simplifies the process of tying a Nail Knot. It features a small tube or hook that helps in wrapping the backing around the fly line securely. This tool provides leverage and makes it easier to create tight wraps.
Fly Line Backing Spool
A Fly Line Backing Spool is a cylindrical container that holds the backing. It keeps the backing organized and prevents tangles. The spool typically has a center hole that allows you to feed the backing through smoothly while attaching it to the fly line.
Scissors
Scissors are essential for trimming excess line and tag ends after tying the knots. Make sure to use sharp scissors to achieve clean cuts, as a frayed or uneven cut can affect the strength and performance of the connection.

Lighter or Heat Source
Having a lighter or heat source on hand is useful for sealing the ends of certain types of backing, such as braided or fused lines. By briefly applying heat to the cut ends, you can prevent fraying and ensure a neat finish.
These tools are readily available at most fishing tackle stores or online retailers. Investing in quality tools will make the process of attaching fly line to backing more efficient and enjoyable.
Steps for Attaching Fly Line to Backing
Preparing the Fly Line
Before attaching the fly line to backing, it’s important to prepare the fly line by removing any factory loops or tags. This ensures a smooth and secure connection between the fly line and the backing. Use a pair of scissors to carefully cut off any excess material.
Preparing the Backing
Ensure that the backing is properly spooled and free from tangles. If needed, unwind the backing from the spool and straighten out any kinks or twists. This will prevent any complications during the attachment process.
Tying the Knot
Choose the desired knot from the methods mentioned earlier and follow the specific instructions for tying that knot. Take your time and make sure each wrap is tight and secure. A well-tied knot will provide the strength and reliability necessary for successful fly fishing.

Securing the Knot
Once the knot is tied, it’s crucial to test its strength and security. Pull on both the fly line and the backing to ensure that the knot holds under pressure. If the knot slips or feels weak, re-tie it using the same method or try a different knot for a stronger connection.
Trimming Excess Line
After confirming the knot’s strength, trim any excess line or tag ends using sharp scissors. Leaving too much excess line can interfere with casting and cause tangles. Aim to have a clean and neat finish, ensuring that the trimmed ends are close to the knot without compromising its integrity.
By following these steps, you can confidently attach your fly line to backing, setting yourself up for a successful and enjoyable fly fishing experience.
Tools Required for Attaching Fly Line to Backing
When it comes to attaching fly line to backing, having the right can make the process much easier and more efficient. Here are the essential tools you’ll need:
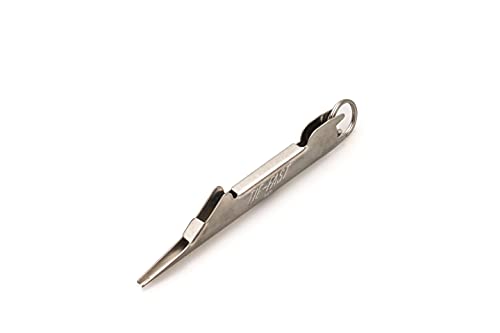
Nail Knot Tool
The nail knot is a popular method for attaching fly line to backing, and a nail knot tool can greatly simplify the process. This tool typically consists of a small metal tube with a groove on one end and a loop on the other. To use it, you simply insert the fly line and backing into the tube, wrap them around the groove, and then pull the loop through the wraps. This creates a secure and reliable connection between the two.
Fly Line Backing Spool
A fly line backing spool is a must-have tool for any angler. This spool is designed to hold the backing line, which serves as a foundation for the fly line. It allows you to easily manage and store your backing, ensuring that it remains tangle-free and readily accessible when you need it. Look for a spool that is durable, lightweight, and has a convenient line-locking mechanism to keep the backing securely in place.
Scissors

Having a pair of sharp scissors is essential for trimming excess line, cutting knots, and making precise adjustments during the attachment process. Look for scissors with a fine tip and a serrated edge, as they provide better control and allow for clean cuts without fraying the line. It’s also helpful to have a pair of scissors with a comfortable grip, as you may be using them for extended periods of time.
Lighter or Heat Source
While not always necessary, a lighter or heat source can be useful for certain types of knots, such as the nail knot, which may require heat to secure the connection. This heat source can be used to slightly melt the line, creating a stronger bond. However, it’s important to exercise caution and avoid overheating or melting the line, as this can weaken the material. Use the lighter or heat source sparingly and with care.
By having these tools readily available, you’ll be well-equipped to attach your fly line to backing with ease and efficiency. Remember to handle the responsibly and follow the manufacturer’s instructions for proper use. With the right tools in hand, you’ll be ready to hit the water and enjoy a successful fishing experience.
Nail Knot Tool
The nail knot tool is a handy device that simplifies the process of tying a nail knot when attaching fly line to backing. This tool consists of a small metal tube with a groove on one end and a loop on the other. To use it, follow these steps:
- Insert the fly line and backing into the tube, with the backing extending slightly beyond the tube.
- Wrap the backing and fly line around the groove of the tool for about 6-8 turns.
- Pull the loop end of the tool through the wraps, creating a small loop.
- Carefully insert the tag end of the backing through the loop.
- Wet the knot with water or saliva to lubricate it.
- Slowly pull the tool away from the knot, sliding the knot down to the end of the fly line.
- Trim any excess line.
The nail knot tool provides a secure and reliable connection between the fly line and backing, ensuring that they remain intact even under the pressure of a fighting fish. It’s a valuable tool for any angler and can save you time and frustration when attaching your gear.
Fly Line Backing Spool
A fly line backing spool is a practical tool that helps you manage and store your backing line effectively. This spool is designed to hold the backing in a neat and organized manner, preventing tangles and knots. Here’s how to use a fly line backing spool:
- Start by removing the backing from its original packaging or spool.
- Locate the center hole in the backing spool and thread the backing through it.
- Begin winding the backing onto the spool, making sure to keep the line tight and even.
- Continue winding until you have the desired amount of backing on the spool, leaving enough space for the fly line.
- Secure the backing by locking it in place using the spool’s line-locking mechanism or by tying a simple knot.
Using a fly line backing spool not only keeps your backing organized but also allows for easy access and quick line changes when needed. It’s a practical tool that every angler should have in their tackle box.
Scissors
Scissors are an essential tool when attaching fly line to backing. They serve multiple purposes, such as trimming excess line, cutting knots, and making precise adjustments. Here are a few tips for using scissors effectively:
- Use sharp scissors with a fine tip and a serrated edge for better control and clean cuts.
- Hold the line firmly and cut smoothly to avoid fraying or damaging the line.
- Keep a separate pair of scissors specifically for fishing purposes to prevent cross-contamination with other materials.
Having a reliable pair of scissors in your fishing kit ensures that you can make accurate and clean cuts when attaching your fly line to backing. They are a versatile tool that comes in handy in various fishing scenarios.
Lighter or Heat Source
A lighter or heat source can be useful when attaching fly line to backing, particularly for certain types of knots that require heat to secure the connection. However, it’s important to exercise caution and use a lighter or heat source sparingly to prevent overheating or melting the line. Here are a few considerations when using a lighter or heat source:
- Use a lighter with a controlled flame or a heat source specifically designed for fishing purposes.
- Apply heat to the knot only as needed and for a short duration to avoid damaging the line.
- Test the strength of the knot after applying heat to ensure it remains secure.
A lighter or heat source can be a helpful tool when attaching fly line to backing, but it’s essential to use it responsibly and with care. Always follow the manufacturer’s instructions and prioritize safety when handling any heat source.
Steps for Attaching Fly Line to Backing
Preparing the Fly Line
Before attaching the fly line to the backing, it is essential to prepare the fly line properly. This step ensures a secure and reliable connection between the two.
First, ensure that the fly line is clean and free from any debris or dirt. A dirty fly line can compromise the strength and durability of the connection. Use a mild detergent and warm water to gently clean the fly line, then rinse it thoroughly and allow it to dry completely.
Next, inspect the fly line for any signs of wear or damage. Look for cracks, fraying, or weak spots along the length of the line. If any damage is found, it is best to replace the fly line before proceeding.
Once the fly line is clean and in good condition, you can proceed to the next step of preparing the backing.
Preparing the Backing
Preparing the backing is just as important as preparing the fly line. It ensures that the connection between the two is strong and secure, minimizing the risk of failure during casting or when fighting a fish.
Start by inspecting the backing for any knots, tangles, or twists. Remove any knots or tangles carefully, making sure not to damage the backing in the process. If the backing is twisted, it can affect the line’s ability to lay straight, leading to casting issues.
After untangling and straightening the backing, attach it to a secure surface or spool. This will prevent it from unraveling or tangling during the next steps.
Tying the Knot
Now that both the fly line and backing are prepared, it’s time to tie the knot that will secure them together. There are several different knots you can use for this purpose, each with its own strengths and weaknesses.
One popular knot for attaching fly line to backing is the Nail Knot. This knot requires a nail knot tool or a small tube to assist in tying. It creates a strong and streamlined connection between the two lines.
To tie a Nail Knot, follow these steps:
- Insert the nail knot tool or tube between the end of the fly line and the backing, leaving a small loop.
- Wrap the backing around both the tool and the fly line, making five to seven turns.
- Slide the end of the backing through the small loop created earlier.
- Hold the standing end of the backing and pull the tool or tube out, sliding the knot tight against the fly line.
- Moisten the knot with water or saliva and pull it tight by pulling on the standing end of the backing and the fly line simultaneously.
Securing the Knot
After tying the knot, it is crucial to ensure its security to prevent any slippage or failure. A loose or insecure knot can lead to frustration and lost fish.
To secure the knot, gently tug on both the fly line and backing, checking for any movement or slippage. If the knot holds firm, you can proceed to the next step. However, if you notice any looseness or slippage, it is necessary to retie the knot.
Additionally, lubricating the knot with a fly line dressing or saliva can help reduce friction and increase the knot’s strength. This simple step can make a significant difference in the knot’s overall performance.
Trimming Excess Line
Once the knot is securely tied and tested, it’s time to trim any excess line. Leaving excess line can lead to tangles or interfere with the casting process.
Using a pair of sharp scissors, carefully trim the tag end of the backing as close to the knot as possible without cutting into the knot itself. Be cautious not to cut the fly line or the standing end of the backing.
Trimming the excess line creates a clean and streamlined connection between the fly line and backing, ensuring smooth casting and retrieval.
Tips and Tricks for Attaching Fly Line to Backing
Fly fishing is an art that requires attention to detail, and one important aspect is ensuring a secure connection between the fly line and backing. To help you achieve a reliable attachment, here are some valuable and tricks to consider:
Lubricating the Knot
When tying knots, it’s essential to reduce friction between the line and backing, allowing for a smoother and tighter connection. Lubricating the knot can significantly enhance its strength and durability. There are various lubricants available specifically designed for fishing knots, such as silicone-based lubricants or even saliva. A small amount applied to the knot before tightening can make a world of difference.
Testing the Knot Strength
Before heading out to your favorite fishing spot, it’s crucial to test the strength of the knot. After tying the knot, give it a firm tug to ensure it holds up under pressure. You don’t want to risk losing a prized catch due to a weak connection. By testing the knot strength beforehand, you can have peace of mind and focus on enjoying your fishing experience.
Using a Loop-to-Loop Connection for Quick Line Changes
If you frequently change fly lines or want the flexibility to switch between different setups quickly, a loop-to-loop connection is a fantastic technique to master. This method involves creating a loop at the end of both the fly line and backing. By simply connecting the loops together, you can easily interchange fly lines without the need for retying knots. This is especially handy when adapting to different fishing conditions or targeting various species.
Ensuring Proper Alignment of the Knot
To maximize the strength and reliability of the knot, it’s vital to ensure proper alignment during the attachment process. A misaligned knot may result in weak points and potential failure when fighting a fish. Take the time to carefully align the fly line and backing before tying the knot. Paying attention to this detail can make a significant difference in the overall performance and durability of your setup.
Checking for Knot Slippage
Knot slippage is a common issue that can compromise the connection between the fly line and backing. To avoid this problem, it’s essential to regularly check for any signs of slippage. If you notice the knot starting to loosen or slide, it’s crucial to address it immediately. You can reinforce the knot by applying more pressure or even retying it if necessary. Being proactive in checking for knot slippage ensures a secure and reliable connection while you’re out on the water.
By following these tips and tricks, you can enhance your fly fishing experience and have confidence in the connection between your fly line and backing. Remember, lubricating the knot, testing its strength, utilizing loop-to-loop connections, ensuring proper alignment, and checking for knot slippage are all key aspects to consider. By mastering these techniques, you’ll be well-prepared for any fishing adventure that comes your way.
So, why wait? Get out there and enjoy the thrill of fly fishing with the peace of mind that your fly line and backing are securely attached. Happy fishing!
Table:
Here is a table summarizing the tips and tricks for attaching fly line to backing:
| Tips and Tricks |
|---|
| Lubricate the knot |
| Test the knot strength |
| Use a loop-to-loop connection |
| Ensure proper alignment of the knot |
| Check for knot slippage |
Common Mistakes to Avoid When Attaching Fly Line to Backing
Mistakes happen, but when it comes to attaching your fly line to backing, it’s important to avoid them as much as possible. By understanding and avoiding these common mistakes, you can ensure a secure and reliable connection that will withstand the challenges of fly fishing. Let’s take a closer look at some of the most common mistakes anglers make when attaching their fly line to backing.
Tying the Knot Incorrectly
One of the most crucial aspects of attaching your fly line to backing is tying the knot correctly. A poorly tied knot can lead to slippage, weak connections, and even lost fish. The key to a secure knot is proper technique and attention to detail.
To avoid tying the knot incorrectly, make sure to follow these steps:
- Take your time: Rushing through the knot tying process can lead to mistakes. Slow down and focus on each step to ensure a strong and secure connection.
- Practice makes perfect: Before heading out on your fishing trip, take the time to practice tying the knot. This will help you become more familiar with the process and increase your chances of success when it really counts.
- Seek guidance: If you’re new to fly fishing or struggling with tying the knot correctly, don’t hesitate to seek guidance from experienced anglers or instructional resources. They can provide and tricks to help you master the technique.
Remember, a properly tied knot is the foundation for a successful fly fishing experience, so take the time to get it right.
Not Testing the Knot Strength
Once you’ve tied the knot, it’s essential to test its strength before hitting the water. Many anglers make the mistake of assuming that a knot is secure without actually testing it. This can lead to unexpected failures and lost fish.
To avoid this mistake, follow these steps to test the knot strength:
- Apply gradual pressure: Gently pull on the fly line and backing to test the knot’s strength. Apply gradual pressure to ensure that the knot holds up under tension.
- Inspect for slippage: While testing the knot, keep an eye out for any signs of slippage. If the knot starts to slip or loosen, it’s crucial to re-tie it before heading out on the water.
By taking the time to test the knot’s strength, you can have peace of mind knowing that your connection is secure and reliable.
Overheating or Melting the Line
When attaching your fly line to backing, it’s essential to be mindful of the materials you’re working with. Overheating or melting the line can weaken its integrity and compromise the connection.
To avoid this mistake, keep the following tips in mind:
- Use a lighter or heat source cautiously: If you use a lighter or heat source to seal the ends of your fly line, exercise caution. Hold the flame a safe distance away to prevent direct contact with the line. The goal is to melt the line slightly, not burn or melt it excessively.
- Avoid excessive friction: Excessive friction between the fly line and backing can generate heat and potentially melt the line. When joining the two, be mindful of any rubbing or friction that could lead to overheating.
By being careful and aware of the potential risks, you can avoid overheating or melting your fly line and ensure a strong connection.
Cutting the Line Too Short
Cutting the line too short is a common mistake that can lead to frustration and wasted time on the water. It’s important to have enough backing attached to your fly line to accommodate the potential length of a fish’s run.
To avoid cutting the line too short, follow these guidelines:
- Estimate the necessary length: Consider the type of fish you’ll be targeting and the potential length of their runs. Estimate the amount of line you’ll need and add a bit of extra backing to be safe.
- Measure twice, cut once: Before making any cuts, double-check your measurements. It’s better to have a bit of extra line than to come up short when you need it most.
By taking the time to ensure you have an adequate amount of backing, you can avoid the frustration of running out of line during a fight.
Ignoring Knot Slippage Warning Signs
Knot slippage can be a significant issue when attaching your fly line to backing. Ignoring warning signs of knot slippage can result in lost fish and missed opportunities on the water.
To avoid this mistake, be on the lookout for these warning signs:
- Visible looseness: If the knot appears visibly loose or starts to unravel, it’s a clear indication of potential slippage. Address the issue immediately by re-tying the knot.
- Lack of tension: When testing the knot’s strength, if it feels weak or lacks the necessary tension, it’s an indication that the knot may not be secure. Re-tying the knot is crucial in this situation.
Remember, prevention is key. By paying attention to these warning signs, you can address knot slippage before it compromises your fishing experience.
Troubleshooting Issues with Attaching Fly Line to Backing
Are you experiencing any issues while attaching your fly line to the backing? Don’t worry, you’re not alone. In this section, we will discuss some common problems that anglers face and provide solutions to troubleshoot them effectively. Let’s dive in!
Knot Slippage
One of the most frustrating issues that anglers encounter is knot slippage. Imagine casting your line, only to find that the knot between your fly line and backing has come undone. It can be incredibly disheartening, especially when you have a big fish on the line.
To prevent knot slippage, it is crucial to tie the knot correctly. One popular knot for attaching fly line to backing is the Nail Knot. This knot creates a strong connection, but it is essential to ensure that it is tightened properly. Make sure to moisten the knot before tightening it, as this will help reduce friction and allow the knot to slide smoothly into place.
Another tip to prevent knot slippage is to lubricate the knot. Applying a small amount of saliva or a silicone-based lubricant can help reduce friction and increase the knot’s strength. Additionally, testing the knot strength before heading out to fish is crucial. Give it a gentle tug to ensure that it holds up under pressure.
Weak Knots
Weak knots can be a nightmare for any angler. They can lead to lost fish and wasted time retying knots. Weak knots often result from tying them incorrectly or not giving them enough attention and care.
To ensure strong knots, it is essential to follow the tying instructions carefully. Each knot has its own unique steps, and it is crucial to pay attention to detail. Take your time and make sure each loop is formed correctly and tightened properly.
In cold weather, tying knots can become even more challenging. The cold temperatures make the line stiffer and more difficult to handle. To overcome this issue, consider using gloves or warming the line with your hands before tying the knot. This will make it easier to manipulate the line and ensure a secure knot.
Difficulty Tying Knots in Cold Weather
If you’re an angler who enjoys fishing in colder climates, you may have experienced the frustration of tying knots in cold weather. The low temperatures can make the line stiffer and more challenging to work with.
To tackle this issue, consider using a loop-to-loop connection for quick line changes. This method involves attaching a small loop to the end of your fly line and another loop to the backing. By connecting these loops, you can easily change your fly line without having to tie knots in cold weather. It’s a convenient and time-saving solution.
Backing Spool Tangles
Have you ever encountered a tangled mess while trying to attach your fly line to the backing? Backing spool tangles can be a common issue, causing frustration and wasting precious fishing time.
To avoid backing spool tangles, it is essential to spool the backing onto your reel correctly. Start by attaching the backing to the reel arbor and then wind it onto the spool in an even and tight manner. Avoid overlapping or crossing the backing while spooling it, as this can lead to tangles.
Using a backing barrel knot can also help prevent tangles. This knot creates a small barrel-shaped attachment that sits between the fly line and backing, ensuring a smooth and tangle-free connection. Take your time when tying this knot, ensuring it is secure before moving on.
Line or Backing Damage during the Attaching Process
Lastly, let’s address the issue of line or backing damage during the attaching process. Accidents happen, and it’s essential to take precautions to protect your gear.
When trimming excess line after tying the knot, be careful not to cut the line too short. Give yourself some room for adjustment in case you need to retie the knot or make changes later on.
Another thing to watch out for is overheating or melting the line. If you’re using a lighter or heat source to secure the knot, be cautious not to apply excessive heat that can damage the line or backing. A quick touch of the flame should be enough to seal the knot, without causing any harm.
Always check for any signs of damage or wear on your line or backing before heading out to fish. Inspect the connection points and ensure that everything is secure and in good condition. If you notice any issues, it’s best to replace the line or backing to avoid any potential problems while on the water.
In conclusion, troubleshooting issues with attaching fly line to backing can be a frustrating experience for any angler. However, with the right knowledge and techniques, you can overcome these challenges effectively. Remember to pay attention to knot slippage, tie strong knots, consider cold weather difficulties, prevent backing spool tangles, and avoid line or backing damage. By following these tips and tricks, you’ll be well-equipped to enjoy a successful and hassle-free fishing experience. Happy fishing!


