Learn how to rig for catfishing using the right techniques, knots, hooks, sinker weights, and bobbers. Discover the secrets to successful catfishing with our step-by-step guide.
Choosing the Right Rigging Techniques
When it comes to catfishing, choosing the right rigging techniques can make a significant difference in your success. Understanding the different rigging options available, evaluating the water conditions, and selecting the appropriate rigging equipment are all essential factors to consider.
Understanding the Different Rigging Options
There are various rigging options to choose from when catfishing, each with its own advantages and applications. Let’s explore some of the most commonly used techniques:
- Carolina Rig: The Carolina rig is a popular choice for catfishing in areas with rocky or weedy bottoms. It consists of a sliding sinker above a swivel, followed by a leader and hook. This rig allows the bait to move freely, enticing catfish to strike.
- Slip Bobber Rig: The slip bobber rig is ideal for fishing in deeper waters or areas with strong currents. It involves a bobber that slides up and down the line, allowing you to adjust the depth at which your bait is presented. This rig is excellent for targeting suspended catfish.
- Three-Way Rig: The three-way rig is versatile and effective in various fishing situations. It involves a three-way swivel, with one line leading to the mainline, another to the sinker, and the third to the leader and hook. This rig provides excellent control over the bait’s movement and can be used in both still and flowing waters.
Evaluating the Water Conditions
Before deciding on the rigging technique to use, it’s crucial to evaluate the water conditions you’ll be fishing in. Factors such as depth, current strength, and bottom structure play a significant role in determining the most effective approach. Consider the following:
- Water Depth: Different rigs excel in different water depths. For shallow waters, a Carolina rig or slip bobber rig may work well. In deeper waters, a three-way rig may be more suitable.
- Current Strength: If you’re fishing in an area with a strong current, a slip bobber rig or three-way rig can help keep your bait in the strike zone. These rigs allow for better control and presentation.
- Bottom Structure: Understanding the bottom structure is essential for selecting the right rigging technique. If you’re fishing in an area with rocky or weedy bottoms, a Carolina rig may prevent your line from getting snagged.
Selecting the Appropriate Rigging Equipment
Choosing the right rigging equipment is crucial for a successful catfishing experience. Here are some factors to consider when selecting your gear:

- Rod and Reel: Opt for a medium to heavy-action fishing rod and a reel with a smooth drag system. Catfish can put up a strong fight, so having a sturdy rod and reel combo is essential.
- Line Strength: Select a fishing line with appropriate strength to handle the size of catfish you’re targeting. A monofilament line with a test strength between 12 to 20 pounds is generally suitable for most catfishing situations.
- Hooks and Leaders: Choose hooks and leaders based on the size of the bait you’ll be using and the expected size of the catfish. Circle hooks are often preferred for catfishing, as they tend to hook the fish in the corner of the mouth, reducing the chances of gut-hooking.
- Sinkers: Use sinkers of various weights to adjust the depth at which your bait is presented. Consider the water conditions and the desired presentation when selecting the appropriate sinker size and shape.
Preparing the Fishing Line
Before you can embark on your catfishing adventure, it’s crucial to properly prepare your fishing line. This involves selecting the right fishing line, cleaning and inspecting it, and adding leaders and swivels for added strength and versatility. In this section, we will delve into each step in detail to ensure you are well-equipped for success on the water.
Selecting the Right Fishing Line
Selecting the right fishing line is essential for a successful catfishing outing. There are various types of fishing lines available, each with its own characteristics and benefits. The two most common types of fishing lines are monofilament and braided lines.
Monofilament: Monofilament lines are made of a single strand of nylon, offering excellent versatility and affordability. They are known for their high knot strength and good shock resistance, making them a popular choice among anglers. Monofilament lines also have some degree of stretch, which can be advantageous when catfishing as it helps absorb the catfish’s powerful initial strike.
Braided Lines: Braided lines, on the other hand, are made of multiple strands of high-strength fibers, such as Spectra or Dyneema. These lines have a smaller diameter compared to monofilament lines of the same breaking strength, allowing for increased line capacity on the reel. Braided lines offer excellent sensitivity, minimal stretch, and superior strength, making them ideal for targeting large catfish or fishing in heavy cover.
To determine the right fishing line for your catfishing needs, consider factors such as the size of the catfish you are targeting, the fishing conditions, and your personal preferences. It is also essential to check the fishing regulations of your local fishing area, as some places may have specific guidelines on the type and test strength of fishing lines allowed.
Cleaning and Inspecting the Line
Once you have selected the appropriate fishing line, it’s crucial to clean and inspect it regularly. Over time, fishing lines can accumulate dirt, debris, and even fish slime, which can weaken the line and affect its performance. Cleaning your fishing line not only prolongs its lifespan but also ensures optimal casting and reeling.
To clean your fishing line, follow these simple steps:
- Wipe Down: Use a clean cloth or paper towel to wipe the entire length of the fishing line, removing any visible dirt or debris.
- Soak and Rinse: Fill a basin or bucket with warm water and mild soap. Submerge the fishing line in the soapy water and gently agitate it to remove any stubborn dirt or grime. Rinse the line thoroughly with clean water to remove any soap residue.
- Dry and Inspect: Hang the fishing line to air dry completely. Once dry, inspect the line for any signs of damage, such as nicks, frays, or discoloration. If you notice any significant damage, it’s best to replace the line to ensure optimal performance and prevent line failure during your catfishing adventure.
Regularly cleaning and inspecting your fishing line not only keeps it in top condition but also allows you to identify any potential weak spots or areas that may require additional attention. By taking these proactive measures, you can have confidence in the strength and reliability of your fishing line.
Adding Leaders and Swivels
Adding leaders and swivels to your fishing line can greatly enhance your catfishing setup. Leaders are sections of heavier monofilament or fluorocarbon line that are attached between the main fishing line and the hook. They provide a range of benefits, including abrasion resistance, protection against sharp teeth or rough terrain, and improved stealth.
To add a leader to your fishing line, follow these steps:

- Select the Right Leader Material: Choose a leader material that matches the fishing conditions and the size of catfish you are targeting. Heavier leaders are suitable for fishing in areas with rough terrain or where catfish have sharp teeth, while lighter leaders may be appropriate for more finesse fishing situations.
- Cut the Leader: Measure and cut a section of leader material to your desired length. A typical leader length for catfishing ranges from 24 to 48 inches, depending on personal preference and fishing conditions.
- Attach the Leader: Tie one end of the leader material to the main fishing line using a strong knot, such as an improved clinch knot or a Palomar knot. Ensure the knot is secure and can withstand the force of a catfish’s strike.
- Attach the Hook: Tie the other end of the leader material to the hook using a suitable knot, such as a Palomar knot or a snell knot. Make sure the knot is strong and secure to prevent the hook from coming loose during a battle with a catfish.
Swivels, on the other hand, are small devices that allow the fishing line to rotate freely, reducing line twist and tangling. They are particularly useful when using live bait or fishing with multiple hooks. To add a swivel to your fishing line, simply tie it onto the end of the main line using a knot such as a clinch knot or a uni knot.
By incorporating leaders and swivels into your catfishing setup, you can increase your chances of landing that trophy catfish. Leaders provide added strength and protection, while swivels minimize line twist and tangling, ensuring a smooth and hassle-free fishing experience.
Remember, proper preparation of your fishing line is the foundation for a successful catfishing adventure. By selecting the right fishing line, cleaning and inspecting it regularly, and adding leaders and swivels, you can have confidence in your equipment and focus on reeling in those monster catfish.
Tying Effective Knots
Tying knots is an essential skill for any angler, and mastering a few key knots can greatly improve your success in catfishing. In this section, we will explore three knots that are particularly effective for securing your hooks and ensuring strong hooksets. Let’s dive in and learn how to tie a strong and secure Improved Clinch Knot, master the Palomar Knot, and use a Snell Knot for enhanced hooksets.
Tying a Strong and Secure Improved Clinch Knot
The Improved Clinch Knot is a popular and versatile knot that is widely used in fishing. It is known for its strength and reliability, making it an excellent choice for securing hooks to the fishing line. To tie an Improved Clinch Knot, follow these simple steps:
- Begin by threading the end of the fishing line through the eye of the hook.
- Take the loose end of the line and wrap it around the standing line (the main part of the line) five to seven times.
- After wrapping, thread the loose end of the line back through the loop formed just above the eye of the hook.
- Moisten the knot with water or saliva to lubricate it, then slowly pull the loose end of the line to tighten the knot.
- Trim any excess line, leaving a small tag end for added security.
The Improved Clinch Knot is known for its strength and ability to maintain its integrity even under heavy pressure. It is an excellent choice for attaching hooks to the line, ensuring that your bait stays securely in place and increasing your chances of a successful catch.
Mastering the Palomar Knot
Another knot that every angler should have in their arsenal is the Palomar Knot. This knot is incredibly strong and easy to tie, making it a favorite among many fishermen. To tie a Palomar Knot, follow these steps:
- Double about six inches of the fishing line and pass the doubled line through the eye of the hook.
- Tie a simple overhand knot with the doubled line, creating a loop.
- Take the loop and pass it over the hook, ensuring that the loop is large enough to easily pass over the hook’s entire eye.
- Moisten the knot with water or saliva, then slowly pull both ends of the line to tighten the knot.
- Trim any excess line, leaving a small tag end.
The Palomar Knot is renowned for its strength and is particularly effective with braided fishing lines. It provides a secure connection between the line and the hook, reducing the chances of the knot slipping or breaking during a fierce battle with a catfish.
Using a Snell Knot for Enhanced Hooksets
When it comes to catfishing, a strong hookset is crucial to ensure that the fish is securely hooked and doesn’t escape. The Snell Knot is specifically designed to enhance hooksets, allowing for a better chance of successfully reeling in your catch. Here’s how to tie a Snell Knot:
- Begin by threading the end of the fishing line through the eye of the hook, leaving a long tag end hanging below the hook.
- Hold the tag end alongside the shank of the hook, with the point of the hook facing upward.
- Using your free hand, wrap the tag end around the shank of the hook and the line, creating several tight wraps.
- Continue wrapping until you have created six to eight wraps around the shank.
- Once you have completed the wraps, take the tag end and thread it through the eye of the hook from the bottom, pulling it tight.
- Moisten the knot with water or saliva, then slowly pull the main line to tighten the knot completely.
- Trim any excess line, leaving a small tag end.
The Snell Knot is highly effective in increasing hookset efficiency, ensuring that the hook penetrates the catfish’s mouth and stays firmly in place. It provides a secure connection and minimizes the risk of the hook pulling out during the fight.

Setting Up the Hooks
Choosing the Right Hooks for Catfishing
When it comes to catfishing, choosing the right hooks is crucial for a successful fishing expedition. There are several factors to consider when selecting hooks that will increase your chances of hooking a catfish.
Firstly, you need to consider the type of catfish you are targeting. Different species of catfish have different feeding habits and mouth sizes, so it’s important to choose a hook that is suitable for the specific catfish you are after. For example, if you are targeting smaller channel catfish, a size 2 or 4 hook would be appropriate. On the other hand, if you are going after larger flathead catfish, a size 5/0 or 6/0 hook would be more suitable.
Another factor to consider is the hook style. There are various hook styles available, including J-hooks, circle hooks, and treble hooks. J-hooks are the most commonly used hooks for catfishing, as they are versatile and easy to use. Circle hooks, on the other hand, are designed to improve hooksets and reduce the chances of gut-hooking the fish. Treble hooks are used when using live bait or cut bait and are effective in hooking catfish that tend to strike aggressively.
Determining the Optimal Hook Size
Determining the optimal hook size for catfishing is essential to ensure that your bait is presented in a natural and enticing manner. The size of the hook you choose will depend on various factors, including the size of the bait you are using and the size of the catfish you are targeting.
When it comes to bait size, it’s important to match the hook size to the bait size. If you are using large baits, such as live bluegills or shad, you will need a larger hook to accommodate the bait. On the other hand, if you are using smaller baits, such as nightcrawlers or chicken liver, a smaller hook would be more appropriate.
In terms of catfish size, it’s important to consider the mouth size of the catfish species you are targeting. Smaller catfish, such as channel catfish, have smaller mouths and therefore require smaller hooks. Larger catfish, such as flathead catfish, have larger mouths and require larger hooks to ensure a secure hookset.
Properly Baiting the Hooks
Properly baiting your hooks is essential to entice catfish to bite and increase your chances of a successful catch. There are various bait options available, including live bait, cut bait, and prepared baits. Each type of bait requires a slightly different approach when it comes to baiting the hook.
When using live bait, such as minnows or crawfish, it’s important to hook the bait in a way that allows it to move naturally in the water. For smaller live baits, you can hook them through the lips or just behind the dorsal fin. This allows the bait to swim freely and appear more enticing to the catfish. For larger live baits, such as bluegills or shad, you can hook them through the back or tail to give them more freedom of movement.
When using cut bait, such as chunks of fish or chicken liver, it’s important to thread the bait onto the hook in a way that keeps it secure. You can use a bait holder hook or a treble hook to ensure that the bait stays on the hook during casting and retrieval. Make sure to leave a portion of the hook exposed to increase your chances of a solid hookset.
If you prefer using prepared baits, such as dough baits or stink baits, you can simply mold the bait around the hook and make sure it is secure. Prepared baits come in various forms, such as dip baits or punch baits, so make sure to follow the instructions provided by the manufacturer for the best results.
Adding Sinker Weights
Understanding the Importance of Sinker Weights
When it comes to catfishing, using sinker weights is essential for achieving the desired depth and presentation. Sinker weights serve two main purposes: they help your bait reach the bottom where catfish typically reside, and they provide stability to your rig, preventing it from drifting with the current. By adding sinker weights to your setup, you increase your chances of attracting catfish and getting a successful bite.
Selecting the Appropriate Sinker Size and Shape
Choosing the right sinker size and shape is crucial for optimizing your catfishing experience. The size and shape of your sinker will depend on various factors, including the water conditions, the size of the catfish you are targeting, and the type of bait you are using. Here are some common types of sinkers you can consider:
- Bank Sinkers: These sinkers are commonly used for catfishing as they have a flat shape that prevents them from rolling and getting stuck in rocks or debris. Bank sinkers come in different sizes, ranging from 1 ounce to several ounces, allowing you to choose the appropriate weight based on the depth and current of the water you are fishing in.
- No-Roll Sinkers: As the name suggests, no-roll sinkers are designed to stay in place and minimize the chances of your rig rolling or tangling. They have a unique shape, often resembling a teardrop or a cylinder with a hole in the center. No-roll sinkers are particularly useful when fishing in areas with strong currents or rocky bottoms.
- Egg Sinkers: Egg sinkers are versatile and commonly used in catfishing. They have an oval shape, allowing them to slide freely along the line, giving your bait a natural presentation. The weight of egg sinkers varies, and you can choose the appropriate size based on the depth and current conditions.
Attaching and Adjusting Sinker Weights
Once you have selected the appropriate sinker size and shape, it’s time to attach and adjust them on your line. Here’s a step-by-step guide to help you:
- Sliding the sinker onto the line: Start by sliding the sinker onto your main fishing line. If you are using a swivel, attach it first and then slide the sinker onto the line.
- Securing the sinker: To prevent the sinker from sliding freely, you can use a sinker stopper or a small bead above and below the sinker. This will keep the sinker in place and prevent it from moving up and down the line.
- Adjusting the sinker position: The position of the sinker on your line will depend on the depth you want to fish at. If you are fishing in shallow waters, you may want to place the sinker closer to the hook. For deeper waters, you can slide the sinker further up the line. Experiment with different positions until you find the optimal depth for catfish activity.
Remember to periodically check your sinker weights during fishing sessions. If you notice any changes in the water conditions or if you’re not getting any bites, consider adjusting the sinker position or trying a different size or shape. Flexibility and adaptability are key when it comes to using sinker weights effectively in catfishing.
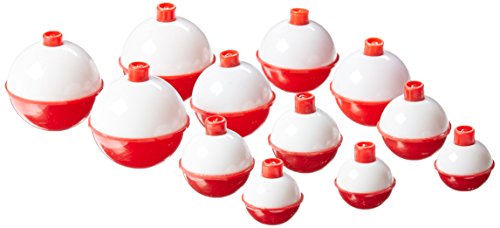
Using Bobbers and Floats
When it comes to catfishing, using bobbers and floats can greatly enhance your chances of success. These simple tools can help you detect bites, keep your bait at the desired depth, and increase your overall fishing efficiency. In this section, we will discuss the different aspects of using bobbers and floats, including when to use them, selecting the right size and type, and properly rigging them for catfishing.
Determining When to Use Bobbers or Floats
One of the first decisions you’ll need to make when using bobbers or floats is determining when it’s appropriate to use them. These tools are particularly useful when fishing in areas with varying water depths or when targeting suspended catfish. By using a bobber or float, you can easily adjust the depth at which your bait is presented, increasing your chances of enticing a bite.
So, when should you use a bobber or float? Well, if you’re fishing in a lake or river with visible structure, such as submerged logs or vegetation, using a bobber or float can help you keep your bait just above these obstacles, reducing the chances of getting snagged. Additionally, if you notice that catfish are feeding near the surface or in shallower water, using a bobber or float can allow you to present your bait at the right depth, right in front of their noses.
Selecting the Right Size and Type of Bobber or Float
Once you’ve determined that using a bobber or float is appropriate for your catfishing situation, the next step is selecting the right size and type. The size and type of bobber or float you choose will depend on various factors, including the depth of the water you’re fishing in, the weight of your bait, and the size of the catfish you’re targeting.
When it comes to size, it’s important to choose a bobber or float that is buoyant enough to support the weight of your bait and provide adequate visibility. A general rule of thumb is to select a bobber or float that is approximately one-third to one-half the depth of the water you’re fishing in. For example, if you’re fishing in six feet of water, a bobber or float that is two to three feet in length would be appropriate.
In terms of type, there are various options available, including round bobbers, slip bobbers, and pencil floats. Round bobbers are the most common and are great for beginners due to their simplicity and ease of use. Slip bobbers, on the other hand, allow you to adjust the depth of your bait without retying your rig, making them ideal for situations where the water depth changes frequently. Pencil floats are more streamlined and are designed for longer casts and fishing in windy conditions.
Properly Rigging Bobbers or Floats for Catfishing
Now that you’ve determined when to use bobbers or floats and selected the right size and type, it’s time to rig them properly for catfishing. Rigging your bobber or float correctly is crucial for achieving the desired presentation and effectively detecting bites.
To rig a bobber or float, start by sliding it onto your fishing line before tying on your hook or attaching your bait. The distance between the bobber or float and your hook will depend on the depth you want to fish at. If you’re fishing in shallower water, you may want to set the bobber or float closer to the hook. Conversely, if you’re targeting deeper water, a longer distance between the bobber or float and the hook will be necessary.
Once you’ve positioned the bobber or float, you can secure it in place by using small adjustable bobber stops or by tying a small knot above and below the bobber or float. These stops or knots will prevent the bobber or float from sliding up and down the line.
To ensure your bobber or float is properly balanced and visible, it’s important to add split shot weights above the hook. These weights will help keep your bait at the desired depth and provide stability to the rig. The number and size of split shot weights will vary depending on the weight of your bait and the depth you’re fishing in.
Overall, using bobbers and floats can greatly enhance your catfishing experience. They provide you with the ability to present your bait at the right depth, detect bites more easily, and increase your chances of landing a catfish. By determining when to use them, selecting the right size and type, and properly rigging them, you’ll be well-equipped to tackle any catfishing challenge that comes your way.
Table: Bobber and Float Selection Guide
| Water Depth | Recommended Bobber/Float Length |
|---|---|
| 1-3 feet | 6-12 inches |
| 3-6 feet | 12-24 inches |
| 6-10 feet | 24-36 inches |
| 10+ feet | 36+ inches |
Assembling and Rigging the Entire Setup
When it comes to catfishing, assembling and rigging your setup properly is crucial for success. In this section, we will go over the steps involved in attaching hooks, sinkers, and bobbers to the line, adjusting the rig for optimal depth and presentation, and testing and fine-tuning the rig for catfishing success.
Attaching Hooks, Sinkers, and Bobbers to the Line
Attaching the right hooks, sinkers, and bobbers to your fishing line is essential for attracting and catching catfish. Let’s take a closer look at each component:
Hooks: Choosing the right hooks for catfishing is important. Catfish have strong jaws and can put up a good fight, so you’ll want to use hooks that are strong and durable. Circle hooks are a popular choice for catfishing as they tend to hook the fish in the corner of the mouth, reducing the risk of deep hooking and increasing the chances of a successful catch. When attaching the hook to your line, make sure it is secured tightly and positioned correctly for maximum effectiveness.
Sinkers: Sinker weights play a vital role in catfishing. They help your bait sink to the desired depth and keep it in place. Understanding the importance of sinker weights is crucial for a successful catfishing trip. Depending on the water conditions and the size of the catfish you’re targeting, you may need to adjust the weight of your sinkers accordingly. It’s also important to select the appropriate size and shape of sinkers to ensure they don’t get snagged on underwater obstacles.
Bobbers: Bobbers, also known as floats, serve as indicators when a catfish bites your bait. They help you detect subtle movements in the water and alert you to potential bites. Choosing the right size and type of bobber is essential for effective catfishing. A larger bobber will be more visible and can support heavier baits, while a smaller bobber is better suited for lighter baits. When rigging your bobber, make sure it is positioned correctly on your line to accurately detect bites.
Now that we’ve covered the basics of attaching hooks, sinkers, and bobbers to your line, let’s move on to adjusting the rig for optimal depth and presentation.
Adjusting the Rig for Optimal Depth and Presentation
To increase your chances of catching catfish, it’s important to adjust your rig for optimal depth and presentation. Here are some key considerations:
Depth: Catfish can be found at various depths depending on factors such as water temperature, time of day, and the presence of food sources. Experimenting with different depths is crucial to finding the sweet spot where catfish are actively feeding. Adjusting the depth of your rig can be done by adding or removing sinkers, or by using a sliding sinker rig that allows the bait to move up and down the line.
Presentation: Catfish are opportunistic feeders and are attracted to both live and dead baits. The way you present your bait can make a big difference in enticing a catfish to strike. Consider using a Carolina rig, which allows your bait to move naturally in the water, mimicking the movements of a live prey. Another effective presentation technique is using a slip bobber rig, which allows you to adjust the depth of your bait easily and keeps it in the strike zone for longer periods.
By adjusting your rig for optimal depth and presentation, you’ll be able to target catfish more effectively and increase your chances of a successful catch. But before you cast your line, it’s essential to test and fine-tune your rig to ensure everything is working as it should.
Testing and Fine-Tuning the Rig for Catfishing Success
Testing and fine-tuning your rig is an important step in catfishing. Here’s what you need to do:
- Check for tangles: Before casting your line, make sure there are no tangles or knots that could hinder your cast or affect the presentation of your bait. Inspecting your rig for any potential issues will save you time and frustration later on.
- Cast and observe: Once your rig is ready, cast your line into the water and observe how it behaves. Does it sink to the desired depth? Is it drifting naturally with the current? Take note of any adjustments you may need to make.
- Make adjustments: If your rig is not performing as expected, don’t be afraid to make adjustments. This could involve adding or removing sinkers, changing the position of your bobber, or even switching to a different bait. Keep experimenting until you find the combination that works best for the current conditions.
- Pay attention to feedback: As you fish, pay close attention to any feedback you receive from the fish. Are you getting frequent nibbles? Are you missing strikes? Adjust your rig accordingly based on the feedback you receive to increase your chances of hooking a catfish.
Remember, catfishing requires patience and persistence. It’s important to continually test and fine-tune your rig based on the conditions you’re fishing in and the behavior of the fish. By being attentive and adaptable, you’ll be well on your way to catfishing success.
Now that you have a solid understanding of how to assemble and rig your setup, as well as how to adjust and fine-tune it for optimal results, you’re ready to hit the water and start catfishing like a pro.


