Discover the tools needed, step-by-step instructions, benefits, and expert tips for successfully tying mono to braid fishing lines. Improve your fishing game today!
Tools Needed for Tying Mono to Braid
Fishing Line Cutter
When it comes to tying mono to braid, having a good cutter is essential. This tool allows you to cleanly cut both types of fishing line, ensuring a smooth and secure connection. A dull cutter can lead to frayed ends, which can weaken the knot and ultimately cause it to fail. Investing in a high-quality fishing line cutter will make the tying process much easier and ensure that your knots are strong and reliable.
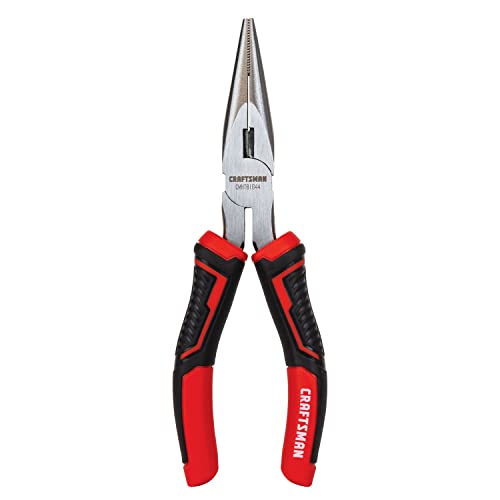
Needle Nose Pliers
Another important tool for tying mono to braid is needle nose pliers. These pliers are perfect for gripping and manipulating the fishing line, making it easier to tie intricate knots. The long, narrow jaws of needle nose pliers allow you to reach tight spaces and ensure that your knots are tight and secure. Whether you’re tying a or an FG knot, needle nose pliers will make the process much smoother and more efficient.
Lighter
While not always necessary, a lighter can be a handy tool to have when tying mono to braid. A quick pass of the flame over the ends of the fishing line can help to seal the knot and prevent it from unraveling. This extra step can provide added security to your knots, especially if you’re fishing in rough conditions or targeting hard-fighting fish. Just be sure to use the lighter carefully and avoid burning the fishing line.
In summary, having the right tools for tying mono to braid can make all the difference in the strength and reliability of your knots. A fishing line cutter, needle nose pliers, and a lighter are all essential items to have in your tackle box when preparing for a successful day on the water.

Steps to Tie Mono to Braid
Double Uni Knot
To begin tying the Double Uni Knot, first lay the two lines parallel to each other, overlapping slightly. Take one end of the mono line and make a loop, wrapping it around both lines 3-4 times. Repeat this step with the braid line, creating another set of wraps. Then, pull both tag ends to tighten the knot, making sure it is secure. Trim any excess line for a clean finish. This knot is known for its strength and reliability, making it a popular choice among anglers.
FG Knot
The FG Knot, also known as the Fine Grip Knot, is another effective method for joining mono to braid. Start by looping the braid line around the mono line and holding it with your thumb and index finger. Begin wrapping the braid around the mono line in a tight, spiral fashion, making at least 20 wraps. Once you have completed the wraps, thread the tag end of the braid through the loops you created, pulling it tight to secure the knot. Trim any excess line for a neat appearance. The FG Knot is favored for its slim profile and smooth casting.
Albright Knot
The Albright Knot is a versatile option for connecting mono to braid. Begin by doubling the braid line and overlapping it with the mono line. Create a loop with the braid line, wrapping it around both lines at least 10 times. Thread the tag end of the braid through the loop you created, then moisten the knot before pulling it tight. Trim any excess line for a clean finish. The Albright Knot is known for its strength and durability, making it a reliable choice for various fishing scenarios.
Incorporating these different knot-tying techniques into your fishing repertoire can enhance your overall fishing experience. Each knot offers its own unique advantages, so it’s essential to practice and find which method works best for your specific needs. Whether you’re targeting big game fish or casting for panfish, having a strong and secure connection between your mono and braid lines is crucial for success on the water. Experiment with these knots and see which one becomes your go-to choice for tying mono to braid.
Benefits of Tying Mono to Braid
Increased Line Strength
When it comes to fishing, having strong and reliable line is crucial. By tying mono to braid, you can combine the best of both worlds. Mono provides stretch and shock absorption, while braid offers superior strength and sensitivity. This combination results in increased line strength that can handle the toughest of fish without breaking. It gives you the confidence to reel in that trophy catch without worrying about your line failing you.
Improved Casting Distance
One of the key benefits of tying mono to braid is the improved casting distance it provides. Braid is thinner and more buoyant than mono, allowing you to cast your lure further out into the water with ease. The reduced drag from the thinner line results in longer and more accurate casts, giving you the ability to reach those hard-to-reach spots where the big fish are hiding. Say goodbye to missed opportunities and hello to increased chances of landing a big one.
Better Sensitivity
Another advantage of using a mono to braid connection is the enhanced sensitivity it offers. Braid is known for its low stretch and high sensitivity, allowing you to feel even the subtlest of bites. By incorporating mono into the mix, you add a level of shock absorption that helps prevent the line from breaking under pressure. This combination results in better sensitivity, giving you the ability to detect bites more effectively and react quickly to hook that fish.
- Increased line strength
- Improved casting distance
- Better sensitivity
Tips for Tying Mono to Braid
Use Lubricant
When it comes to tying mono to braid, using lubricant can make a significant difference in the strength and durability of your knots. Lubricant helps reduce friction between the two lines, making it easier to tie a tight and secure knot. It also helps prevent the lines from binding or cinching too tightly, which can weaken the knot over time. Before you start tying your knots, apply a small amount of lubricant to both the mono and braid to ensure a smooth and seamless tying process.
Pro tip: Use a high-quality lubricant specifically designed for mono and braid connections for the best results.
Practice Makes Perfect
As with any skill, practice is key to mastering the art of tying mono to braid. The more you practice tying different knots and experimenting with different techniques, the more confident and proficient you will become. Set aside some time to practice your knot-tying skills regularly, whether it’s at home or out on the water. By dedicating time to honing your skills, you’ll be able to tie strong and reliable knots with ease, even in challenging conditions.
Pro tip: Challenge yourself by trying out different knot-tying methods and variations to expand your skill set and adaptability.
Check Knot Strength after Tying
After tying your mono to braid connection, it’s essential to check the strength and integrity of the knot before casting your line. Give the knot a gentle tug to ensure that it holds firm and doesn’t slip or come loose. Inspect the knot closely for any signs of weakness or fraying, as these could indicate potential failure points. Taking the time to double-check your knots can help prevent lost fish and frustrating break-offs, ensuring a successful and enjoyable fishing experience.
Pro tip: Consider using a knot strength tester to measure the pulling force required to break the knot and verify its reliability.
By following these tips for tying mono to braid, you can enhance the strength, durability, and performance of your fishing line connections, giving you the confidence to tackle any fishing challenge that comes your way. Remember, practice, attention to detail, and the right tools and techniques are the keys to mastering the art of knot tying in the world of fishing.


