Explore the world of slip float rig fishing. From understanding the components to mastering various techniques, this guide provides valuable and advice for a successful fishing experience.
What is a Slip Float Rig?
Definition and Purpose
A Slip Float Rig is a fishing technique that involves using a float, also known as a bobber, to suspend bait at a desired depth in the water. The slip float itself is a buoyant device that is attached to the fishing line and can slide freely up and down the line. This allows the angler to adjust the depth at which the bait is presented to the fish.
The purpose of a Slip Float Rig is to increase the angler’s chances of catching fish by presenting the bait at the right depth. Different species of fish have different feeding habits and preferences when it comes to depth. By using a slip float, anglers can easily adjust the depth of their bait to match the feeding patterns of the fish they are targeting.
Components of a Slip Float Rig
A Slip Float Rig consists of several key components that work together to create a successful fishing setup.
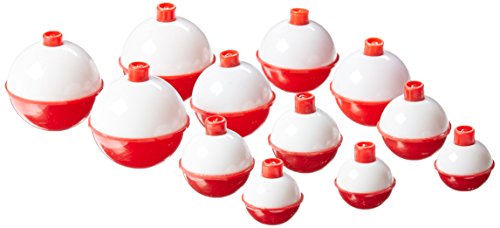
- Slip Float: The slip float itself is the main component of the rig. It is typically made of foam or plastic and is designed to float on the surface of the water. The slip float has a hollow center through which the fishing line passes, allowing it to slide freely up and down the line.
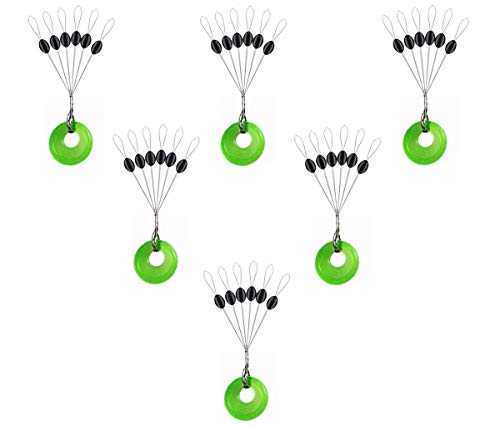
- Bobber Stop: A bobber stop is a small piece of plastic or rubber that is placed on the fishing line above the slip float. Its purpose is to prevent the slip float from sliding beyond a certain point on the line. The bobber stop can be adjusted to change the depth at which the bait is presented.
- Beads: Beads are often used in conjunction with a slip float to add weight and improve casting distance. They are threaded onto the fishing line above the bobber stop and provide additional weight to help the rig cast further.
- Swivel: A swivel is a small device that is attached to the fishing line between the beads and the slip float. It helps prevent line twist and tangling by allowing the rig to spin freely in the water.
- Hook: The hook is where the bait is attached and is an essential part of any fishing rig. The type and size of the hook used will depend on the type of fish being targeted and the bait being used.
Benefits of Using a Slip Float Rig
Using a Slip Float Rig offers several advantages that make it a popular choice among anglers.

- Versatility: Slip Float Rigs can be used in a variety of fishing scenarios, including lakes, rivers, and ponds. They are effective for targeting a wide range of freshwater fish species, including bass, trout, crappie, and panfish.
- Depth Control: One of the biggest benefits of using a slip float is the ability to easily adjust the depth at which the bait is presented. This allows anglers to target fish at different depths in the water column and increases the chances of getting a bite.
- Sensitivity: Slip Float Rigs are highly sensitive and can provide valuable feedback to the angler. When a fish bites the bait, the slip float will move or disappear beneath the water’s surface, indicating a potential strike. This allows anglers to react quickly and set the hook.
- Easy to Use: Slip Float Rigs are relatively easy to set up and use, making them a great option for novice anglers. With a few simple steps, anglers can have their rig ready to go and be fishing in no time.
- Visual Appeal: The sight of a slip float bobbing on the water is visually appealing and can be exciting for anglers. It adds an element of anticipation and excitement to the fishing experience.
Choosing the Right Slip Float
When it comes to choosing the right slip float for your fishing needs, there are several factors to consider. In this section, we will discuss the size and weight considerations, material options, and visibility factors that you should keep in mind.
Size and Weight Considerations
The size and weight of your slip float are crucial factors that can greatly impact your fishing success. The key is to find the balance between buoyancy and stability. Here are some things to consider:
- Buoyancy: The slip float should have enough buoyancy to support the weight of your bait and any additional weight you may add to the rig. If the float is too small or light, it may not be able to keep your bait at the desired depth. On the other hand, if the float is too big or heavy, it may cause your bait to sink too quickly.
- Stability: A slip float that is too small or light may be easily affected by wind or current, making it difficult to keep your bait in the desired location. Conversely, a float that is too big or heavy may be too stable, making it less sensitive to subtle bites.
To determine the right size and weight for your slip float, consider the depth at which you will be fishing, the weight of your bait, and the current or wind conditions. It may require some trial and error to find the perfect balance, but once you do, you will have a rig that is optimized for your specific fishing situation.
Material Options
Slip floats are available in a variety of materials, each with its own advantages and disadvantages. Here are some common material options to consider:
- Balsa Wood: Balsa wood slip floats are popular among anglers for their buoyancy and sensitivity. They are lightweight and highly visible, making them ideal for fishing in calm waters. However, they may not be as durable as other materials and can be easily damaged by rough conditions or aggressive fish.
- Plastic: Plastic slip floats are more durable and resistant to damage than balsa wood floats. They can withstand rough conditions and are less likely to break or crack. Plastic floats also come in a range of colors, allowing you to choose one that is highly visible in different water conditions. However, they may not be as sensitive as balsa wood floats.
- Foam: Foam slip floats are known for their durability and versatility. They are resistant to damage and can withstand rough conditions. Foam floats also have excellent buoyancy and sensitivity, making them a popular choice among anglers. However, they may not be as visible as balsa wood or plastic floats, especially in low light conditions.
Consider the fishing conditions and your personal preferences when choosing the material for your slip float. Each material has its own strengths and weaknesses, so it’s important to find one that suits your specific needs.
Visibility Factors
The visibility of your slip float is crucial for detecting bites and monitoring your bait. Here are some factors to consider when it comes to visibility:
- Color: Choosing a brightly colored slip float can greatly enhance its visibility, especially in low light conditions or murky water. Colors like orange, yellow, and chartreuse are popular choices among anglers. However, keep in mind that fish may be more cautious and wary of brightly colored floats in clear water.
- Size: The size of your slip float can also impact its visibility. A larger float will be easier to spot from a distance, while a smaller float may be more inconspicuous. Consider the fishing conditions and the behavior of the fish you are targeting when deciding on the size of your float.
- Additional Markings: Some slip floats come with additional markings, such as stripes or dots, to enhance their visibility. These markings can help you easily distinguish your float from others in the water and make it easier to detect subtle movements or bites.
Experiment with different colors, sizes, and additional markings to find the combination that works best for you. Remember, the visibility of your slip float can greatly affect your fishing success, so it’s worth investing some time and effort into finding the right one.
Setting Up a Slip Float Rig
When it comes to setting up a slip float rig, there are a few key steps to follow in order to ensure success. In this section, we will discuss selecting the proper line and leader length, attaching the slip float to the line, and adding weight to the rig. By understanding these components and following the proper techniques, you’ll be well on your way to setting up an effective slip float rig.
Selecting the Proper Line and Leader Length
Before you can begin setting up your slip float rig, it’s important to choose the right line and leader length. The line you select should be strong enough to handle the weight of the fish you are targeting, while also providing good visibility in the water. Fluorocarbon and monofilament lines are popular choices for slip float rigs, as they offer both strength and visibility.
When it comes to leader length, it’s crucial to consider the depth at which you will be fishing. A general rule of thumb is to use a leader that is two to three times the depth of the water. This will allow your bait to float freely at the desired depth, while still giving you control over the rig.
Attaching the Slip Float to the Line
Once you have selected the proper line and leader length, it’s time to attach the slip float to the line. Start by threading the line through the top of the slip float, ensuring that it is securely in place. Next, tie a small knot at the end of the line to prevent the slip float from sliding off.
To further secure the slip float, it’s a good idea to add a small bead or two above the float. This will act as a stopper, preventing the float from sliding down the line and potentially tangling.
Adding Weight to the Rig
Adding weight to your slip float rig is essential for achieving the desired depth and stability. The amount of weight you use will depend on the conditions you are fishing in, such as the current and wind speed. It’s important to experiment with different weights to find what works best for your specific situation.
To add weight, you can use split shot sinkers or small sinker beads. These can be placed on the line below the slip float, allowing them to sink and keep your rig in place. It’s important to evenly distribute the weight along the line, as this will help prevent tangles and ensure a smooth presentation.

Remember, the weight you choose should be appropriate for the size of the slip float and the bait you are using. Too much weight can cause the rig to sink too quickly, while too little weight may result in the rig not reaching the desired depth.
In summary, setting up a slip float rig involves selecting the proper line and leader length, attaching the slip float to the line, and adding weight to the rig. By following these steps and considering the specific conditions you are fishing in, you’ll be well on your way to setting up a successful slip float rig. So, grab your gear, choose the right line, and let’s get started on your slip float rig setup adventure!
Baiting and Casting with a Slip Float Rig
When it comes to and casting with a slip float rig, there are a few key considerations to keep in mind. From choosing the right bait to mastering proper casting techniques, these factors can greatly impact your success on the water. Additionally, monitoring the float for bites is crucial in ensuring that you are able to detect when a fish is interested in your bait. In this section, we will delve into each of these aspects, providing you with the knowledge you need to make the most of your slip float rig fishing experience.
Choosing the Right Bait
Selecting the right bait is essential when fishing with a slip float rig. Different types of bait will attract different species of fish, so it’s important to understand what you’re targeting and what they prefer. Whether you’re pursuing panfish, bass, or trout, there is a wide range of bait options available to you.
- Some popular choices for slip float fishing include live bait such as worms, minnows, and insects. These natural baits can be highly effective in enticing fish to bite.
- Artificial baits, such as soft plastics or lures, can also be used with a slip float rig. These baits come in a variety of shapes, colors, and sizes, allowing you to mimic the natural prey of the fish you’re targeting.
Experimenting with different bait options is often the best way to determine what works best in your specific fishing location. Keep in mind that certain baits may be more effective during different times of the year or under specific weather conditions. By staying open to trying new baits and observing the behavior of the fish, you can increase your chances of success.

Proper Casting Techniques
Mastering proper casting techniques is crucial for effectively presenting your bait with a slip float rig. The goal is to cast the rig out to your desired location without causing any disturbances that may scare off nearby fish. Here are some to help you improve your casting skills:
- Start by holding the slip float rig at the end of your fishing rod, ensuring that the line is properly threaded through the float and the weight is securely attached.
- With a smooth, controlled motion, bring the rod back behind you, loading it with energy.
- As you begin the forward cast, release the line at the right moment to allow the rig to sail through the air.
- Aim for a target spot on the water, ideally near structure or areas where fish are likely to be hiding.
- Gently follow through with the cast, allowing the rig to land softly on the water’s surface.
Remember to practice your casting technique to develop accuracy and distance. By consistently working on your casting skills, you’ll be able to place your bait precisely where you want it, increasing your chances of attracting fish.
Monitoring the Float for Bites
Once your slip float rig is in the water, it’s important to keep a close eye on the float for any signs of bites. The float serves as a visual indicator, alerting you to the presence of fish. Here are some for effectively monitoring the float:
- Pay attention to any movement or irregularities in the float. Even the slightest twitch or bob can indicate that a fish is showing interest in your bait.
- Avoid distractions and maintain focus on the float. This will allow you to notice even subtle movements that could be easily missed.
- Be patient and give the fish time to fully take the bait before setting the hook. It’s common for fish to initially nibble or play with the bait before committing to a bite.
By closely monitoring the float, you’ll be able to react quickly when a fish strikes. This can make a significant difference in your success rate while slip float fishing.
Techniques for Fishing with a Slip Float Rig
Fishing with a slip float rig opens up a world of possibilities for anglers. This versatile technique allows you to target a variety of fish species in different fishing scenarios. In this section, we will explore three popular techniques for fishing with a slip float rig: drift fishing, still fishing, and vertical jigging.
Drift Fishing
Drift fishing with a slip float rig is an excellent technique for covering a large area of water and targeting fish that are actively moving. It involves allowing the rig to drift naturally with the current or wind, presenting your bait in a natural and enticing manner.
To set up for drift fishing, you’ll want to choose a slip float that matches the depth and current conditions you’ll be fishing in. Adjust the depth of your bait by sliding the bobber stop up or down the line. Remember to leave some slack line between the bobber stop and the slip float to allow for natural movement.
Once you’re ready, cast your slip float rig slightly upstream or upwind and let it drift along with the current or wind. Pay close attention to the movement of the float. If it dips below the surface or moves erratically, it could be an indication of a bite. When you detect a bite, give a slight tug to set the hook and reel in your catch.
Drift fishing with a slip float rig is particularly effective in rivers or streams where fish are actively feeding and moving with the current. It allows you to cover a wide range of water and increase your chances of hooking into fish.
Still Fishing
Still fishing with a slip float rig is a more stationary technique that works well in calm waters such as lakes, ponds, or slow-moving rivers. It is an excellent choice for targeting fish that prefer to hang out in specific areas or for presenting your bait at a precise depth.
To set up for still fishing, choose a slip float that matches the depth you’ll be fishing in. Adjust the depth of your bait by sliding the bobber stop up or down the line. Unlike drift fishing, you’ll want to eliminate any slack line between the bobber stop and the slip float to maintain a stationary presentation.
Once you’ve set up your rig, cast it out to your desired fishing spot. Allow the slip float to settle on the surface and keep an eye on it for any movement. Fish are more likely to take interest in a bait that appears natural and stationary. If you notice any subtle movements or the float disappears, it could be a sign of a bite. Give a gentle tug to set the hook and reel in your catch.
Still fishing with a slip float rig is an effective technique for targeting fish like bass, trout, or panfish that tend to hang out near cover or in specific depths. It allows you to present your bait precisely at the level where the fish are actively feeding, increasing your chances of success.
Vertical Jigging
Vertical jigging with a slip float rig is a technique that combines the benefits of both drift fishing and still fishing. It involves using the slip float to present your bait vertically beneath your boat or in a specific area, mimicking the movement of prey and enticing fish to strike.
To set up for vertical jigging, choose a slip float that allows you to adjust the depth easily. Attach your bait to a jig head or a weighted hook and adjust the depth by sliding the bobber stop up or down the line. The key to successful vertical jigging is to keep your bait within the strike zone of the fish.
Once you’re ready, lower your slip float rig straight down into the water. Use slight twitches of your rod tip to create a subtle up-and-down movement of the bait. This mimics the natural movement of prey and attracts the attention of nearby fish. Keep a close eye on the slip float for any movement or sudden disappearance, as it could be an indication of a bite. When you feel a strike, set the hook and reel in your catch.
Vertical jigging with a slip float rig is highly effective for targeting fish that are holding in deeper water or suspending near structures such as submerged trees or rock formations. It allows you to keep your bait in the strike zone for a longer period, increasing your chances of enticing a bite.
Troubleshooting and Tips for Using a Slip Float Rig
Fishing with a slip float rig can be a rewarding experience, but like any fishing technique, it comes with its own set of challenges. In this section, we will discuss some common to help you overcome these challenges and make the most of your slip float rig.
Preventing Tangles
Tangles are one of the most frustrating issues that anglers encounter when using a slip float rig. They can occur when the line gets twisted or tangled around the float or other components of the rig. Fortunately, there are several measures you can take to prevent tangles and keep your fishing experience hassle-free.
- Choose the right line: Opt for a line that has low memory and is less prone to tangling. Monofilament or fluorocarbon lines are popular choices for slip float rigs due to their smoothness and flexibility.
- Use a swivel: Adding a small swivel between the mainline and the leader can help reduce line twist and tangles. The swivel acts as a pivot point, allowing the rig to rotate freely without causing the line to twist.
- Avoid excessive casting force: When casting, avoid using excessive force or whipping motions. Instead, make smooth and controlled casts to minimize the chances of line tangling.
- Check for line twist: Regularly check your line for any signs of twist or tangles. If you notice any, simply let out some line and allow the rig to untwist itself in the water.
Adjusting Depth and Float Placement
Properly adjusting the depth and float placement is crucial for a successful slip float rig setup. The depth at which your bait is presented can greatly impact your chances of attracting fish. Here are some to help you adjust the depth and float placement effectively.
- Experiment with different depths: Start by setting your slip float at a depth that you think might be suitable for the target species. If you’re not getting any bites, try adjusting the depth incrementally until you find the sweet spot.
- Consider the water conditions: The water depth, current, and structure should all be taken into account when determining the best float placement. Fish tend to hold at different depths based on these factors, so adjusting accordingly can increase your chances of success.
- Use a depth finder: Investing in a depth finder can be beneficial, especially when fishing in unfamiliar waters. A depth finder allows you to accurately determine the depth at which you’re fishing, making it easier to adjust your float placement.
- Pay attention to the fish’s behavior: If you notice that fish are consistently biting at a specific depth, make note of it and adjust your float placement accordingly. Observing their behavior can provide valuable insights into their preferred feeding zone.
Detecting Subtle Bites
One of the challenges of using a slip float rig is detecting subtle bites. Fish can sometimes nibble at the bait without causing a noticeable movement of the float. However, with the right techniques and a keen eye, you can still detect these subtle bites and increase your chances of hooking a fish.
- Pay attention to line movement: While the float may not show much activity, keep an eye on the line itself. If you notice any slight movements or twitches that are not caused by current or wind, it could be an indication of a bite.
- Use a sensitive float: Opt for a slip float that is sensitive and responsive to even the slightest nibbles. A float with a thin stem or a balsa wood construction can enhance your ability to detect subtle bites.
- Engage your senses: Besides visual cues, pay attention to other sensory signals. Keep an ear out for any unusual sounds like the line being pulled against the reel or the bait being disturbed. Additionally, be alert to any changes in tension or resistance when reeling in your line.
- Stay focused and patient: Detecting subtle bites requires concentration and patience. Avoid distractions and maintain a steady watch over your rig. It may take some time to develop a feel for these delicate movements, but with practice, you’ll become more adept at recognizing them.
In conclusion, and mastering the art of using a slip float rig involves preventive measures to avoid tangles, adjusting the depth and float placement to maximize your chances of success, and honing your skills in detecting subtle bites. By following these and techniques, you’ll enhance your fishing experience and increase your chances of landing that prized catch. So, get out there, cast your slip float rig, and enjoy the thrill of fishing with this versatile and effective technique!


