Discover the materials needed, assembly steps, and finishing touches for making your own fishing rod from scratch. Customize it to suit your fishing style.
Materials Needed
Fishing Rod Blank
When it comes to building your own fishing rod, the first essential item you’ll need is a fishing rod blank. This is the main body of the rod, the foundation on which you’ll build the rest of your custom rod. Fishing rod blanks come in a variety of materials, such as fiberglass, graphite, or a combination of the two. Each material has its own unique characteristics, so it’s important to choose one that suits your fishing style and preferences.
Fishing Reel
Next on the list of materials needed is a fishing reel. The reel is what allows you to reel in your catch once you’ve hooked it. There are many different types of fishing reels available, from spinning reels to baitcasting reels to fly reels. Again, it’s important to choose a reel that matches the type of fishing you’ll be doing and the fish you’ll be targeting.
Fishing Line
No fishing rod is complete without fishing line. The fishing line is what connects your hook to your reel and allows you to cast your line out into the water. There are several types of fishing line to choose from, including monofilament, fluorocarbon, and braided line. The type of line you choose will depend on the fishing conditions and the type of fish you’re targeting.
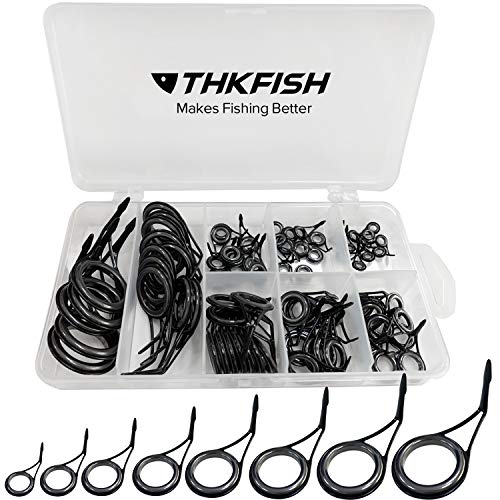
Rod Guides
Rod guides are small metal rings that are attached to the fishing rod blank. These guides help guide the fishing line along the length of the rod, reducing friction and allowing for smoother casts and retrieves. Rod guides come in various sizes and materials, so it’s important to choose the right ones for your specific rod blank and fishing style.

Handle and Grip
Last but not least, you’ll need a handle and grip for your custom fishing rod. The handle is where you’ll grip the rod while fishing, and the grip provides added comfort and stability. Handles and grips come in a variety of materials, such as cork, EVA foam, or rubber, so you can choose one that feels comfortable in your hand and provides the right amount of grip.
In summary, building your own fishing rod requires a few key materials: a fishing rod blank, a fishing reel, fishing line, rod guides, and a handle and grip. Each of these materials plays a crucial role in the performance and functionality of your custom rod, so it’s important to choose high-quality components that suit your fishing style and preferences. By selecting the right materials and assembling them correctly, you can create a custom fishing rod that is perfectly tailored to your needs and will provide years of fishing enjoyment.
Assembly Steps
Prepare the Rod Blank
When it comes to building your own fishing rod, the first step is to prepare the rod blank. The rod blank is the main body of the fishing rod, and it typically comes in a solid, one-piece form. Before you can start assembling the rod, you need to make sure the blank is clean and free of any debris. Inspect the blank for any imperfections or damage that may affect the performance of the rod. Once you have inspected and cleaned the rod blank, you are ready to move on to the next step.
Attach the Rod Guides
The rod guides are essential components of a fishing rod as they help guide the fishing line along the length of the rod. To attach the rod guides, you will need a set of guide spacing measurements to ensure they are evenly distributed along the length of the rod blank. Start by attaching the first guide at the tip of the rod and work your way down towards the handle, following the spacing measurements. Make sure each guide is securely attached to the rod blank to prevent any movement during use.
Install the Reel Seat
The reel seat is where the fishing reel will be attached to the rod. To install the reel seat, you will need to carefully measure and mark the placement on the rod blank. Once you have determined the correct placement, use epoxy or a similar adhesive to secure the reel seat in place. Make sure the reel seat is aligned properly with the rod guides to ensure smooth operation when casting and reeling in fish.

Add the Handle and Grip
The handle and grip of a fishing rod play a crucial role in providing comfort and control while fishing. When adding the handle and grip, make sure to choose materials that are durable and comfortable to hold for long periods. Attach the handle to the rod blank using epoxy or screws, depending on the design of the handle. Once the handle is securely in place, add the grip over the handle for added comfort and grip during use.
Spool the Fishing Line
Spooling the fishing line onto the reel is the final step in assembling your fishing rod. Before spooling the line, make sure the reel is properly attached to the rod and that the drag system is set to the desired tension. Begin by threading the line through the rod guides and then onto the reel spool. Use even tension to ensure the line is spooled neatly and securely onto the reel. Once the line is spooled, your fishing rod is ready for action.
By following these assembly steps, you can create a custom fishing rod that is tailored to your preferences and fishing style. Each component plays a vital role in the performance of the rod, so take your time and pay attention to detail to ensure a successful build. Now, grab your new custom rod and hit the water for an unforgettable fishing experience.
- Choose high-quality materials for a durable and reliable fishing rod.
- Take your time to carefully assemble each component for optimal performance.
- Test your rod before heading out on your fishing adventure to ensure everything is working properly.
Finishing Touches
Check Alignment and Balance
After assembling your fishing rod, it’s important to check the alignment and balance to ensure optimal performance on the water. Start by holding the rod horizontally and visually inspecting the rod guides to make sure they are straight and in line with each other. If any guides appear misaligned, gently adjust them to create a smooth, continuous curve from the tip to the handle.
Next, hold the rod vertically and check for balance. A well-balanced rod will feel comfortable and natural in your hand, with the weight evenly distributed throughout. You can test the balance by placing a finger near the handle and adjusting any components as needed to achieve the perfect balance.
Secure Loose Components
Loose components can be a common issue with newly assembled fishing rods, so it’s crucial to secure them properly before hitting the water. Check all connections, including the reel seat, rod guides, and handle, to ensure they are tightly fastened. Use a screwdriver or wrench if necessary to tighten any loose screws or bolts.
Additionally, inspect the fishing line for any tangles or knots that could affect the performance of your rod. Make sure the line is spooled correctly and securely attached to the reel to prevent any issues while casting or reeling in your catch.
Test Cast the Rod
Before heading out on your fishing adventure, it’s essential to test cast your rod to ensure everything is in working order. Find an open area where you can practice casting without any obstacles in your way. Hold the rod with a firm grip and smoothly cast the line out into the water, paying attention to how it feels and performs.
Adjust the tension on the reel as needed to achieve the desired casting distance and accuracy. Practice casting from different angles and distances to get a feel for how your rod handles different scenarios. This will not only help you fine-tune your casting technique but also identify any potential issues that may need to be addressed before your fishing trip.
Customize with Personal Touches
Once you’ve checked the alignment, secured loose components, and tested the casting performance of your rod, it’s time to add some personal touches to make it your own. Consider adding custom wraps or decals to the rod blank, or personalizing the handle with your name or favorite fishing quote.

You can also customize the rod with accessories such as a rod holder, hook keeper, or line cutter to enhance its functionality and convenience. Adding these personal touches not only makes your rod unique to you but also adds a touch of personality and style to your fishing gear.
In conclusion, taking the time to complete these finishing touches will not only improve the performance of your fishing rod but also enhance your overall fishing experience. By checking alignment and balance, securing loose components, testing the rod’s casting ability, and adding personal touches, you’ll be ready to hit the water with confidence and style. Happy fishing!


