Get ready to catch and cook your crappie with confidence!
Preparing to Fillet a Crappie
Before you begin the process of filleting a crappie, it’s essential to prepare yourself with the right tools and a clean workspace. Think of it like preparing for a surgical operation – you need the right instruments and a sterile environment to ensure success.
Gathering Essential Tools and Equipment
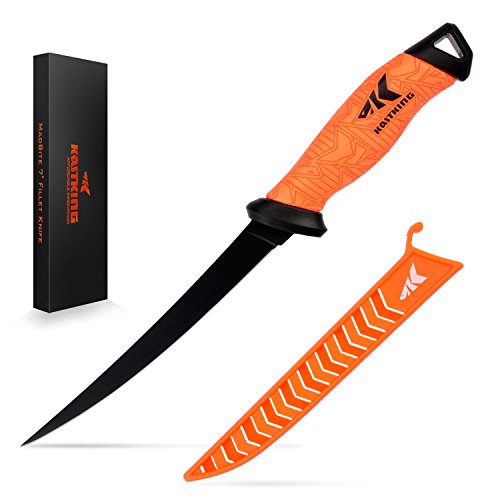
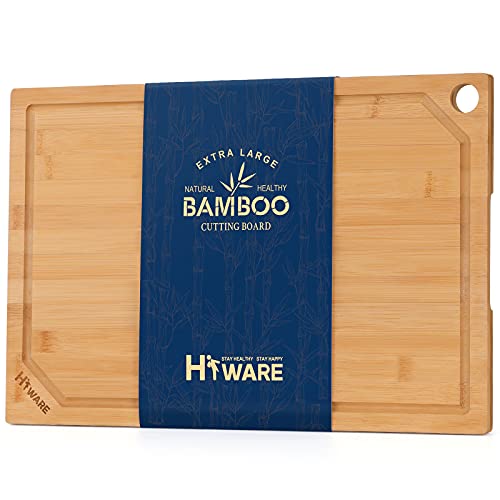
So, what are the essential tools and equipment you’ll need to fillet a crappie? A good fillet knife is the most critical tool you’ll need. Look for a knife with a thin, flexible blade that’s specifically designed for filleting fish. A pair of tweezers or needle-nose pliers can also come in handy for removing hooks or other debris from the fish’s mouth or body. A cutting board or other clean, flat surface is also a must-have for filleting.
Preparing a Clean Workspace
Now that you have your tools and equipment, it’s time to prepare your workspace. A clean workspace is crucial for preventing contamination and ensuring a safe, healthy filleting process. Choose a surface that’s easy to clean and sanitize, such as a plastic or stainless steel cutting board. Make sure to wash your hands thoroughly before handling the fish, and consider wearing gloves to prevent any potential bacterial transfer. By taking the time to prepare your tools and workspace, you’ll be well on your way to filleting like a pro!
Removing the Gills and Guts
The process of gutting a crappie can seem daunting, but trust us, with the right guidance, you’ll be a pro in no time. It’s crucial to remove the gills and guts carefully to ensure a clean and safe filleting process.

Making the First Incision
Hold the crappie firmly on its side, with the belly facing you. Locate the anus, which is the small hole located just behind the ventral fin. Using your fillet knife, make a shallow incision on the belly, starting from the anus and moving upwards towards the gill plates. Be careful not to cut too deeply, as you want to avoid piercing the innards.
Extracting the Internal Organs
Using your fingers or a pair of kitchen shears, carefully pry open the incision and gently begin to extract the internal organs. You’ll notice the organs are held together by a thin membrane. As you extract the organs, you may need to cut through some of the connecting tissue. Be gentle, as you want to avoid spilling any of the innards into the cavity.
Rinsing the Cavity
Once you’ve removed the internal organs, use a gentle stream of cold water to rinse out the cavity. This step is crucial in removing any remaining blood, scales, or debris that may be lingering inside the fish. Use your fingers to gently scrub the inside of the cavity, paying particular attention to the areas around the rib cage and spine.
Filleting the Crappie
Filleting a crappie can seem like a daunting task, but with the right approach, you’ll be enjoying a delicious meal in no time. In this section, we’ll guide you through the process of filleting a crappie, making it easy to follow along and achieve professional-like results.
Making the Initial Cut
The initial cut is the most crucial step in filleting a crappie. It sets the stage for the rest of the process, and getting it right will make the entire experience much smoother. To make the initial cut, hold the crappie firmly on a stable surface, with the belly facing upwards. Locate the spine, which runs along the top of the fish, and find the spot where the spine meets the rib cage. This is where you’ll make your first incision. Hold your fillet knife at a 45-degree angle, with the blade facing the spine. Gently push the knife into the fish, applying gentle pressure, until you feel the blade touch the spine.
Think of this process as opening a package – you need to carefully cut along the seams to avoid damaging the contents. In this case, the contents are the delicate fillets you’re trying to extract. As you make the cut, use a gentle sawing motion to help the knife glide smoothly through the fish. This will help prevent tearing the flesh and result in a cleaner, more precise cut.
Separating the Fillet from the Rib Cage
Now that you’ve made the initial cut, it’s time to separate the fillet from the rib cage. This is where things can get a bit tricky, but don’t worry – with a little patience and practice, you’ll be a pro in no time. Hold the crappie firmly, and use your fillet knife to carefully pry the fillet away from the rib cage. Start at the tail end of the fish and work your way up, using a gentle twisting motion to help release the fillet.
Imagine you’re trying to remove a sticker from a surface – you need to coax it away slowly and carefully to avoid tearing it. That’s essentially what you’re doing here, except the sticker is a delicate piece of fish, and the surface is the rib cage. As you separate the fillet, use your knife to cut any remaining connective tissue, taking care not to cut too deeply and damage the fillet.
Removing the Bloodline and Blood Meat
The bloodline and blood meat can be a bit of a nuisance when filleting a crappie. Not only do they affect the appearance of the fillet, but they can also impart a bitter flavor to the fish. To remove the bloodline and blood meat, hold the fillet skin-side down and locate the dark red lines running along the lateral line. Use your fillet knife to carefully cut along these lines, removing the bloodline and blood meat as you go.
Think of this process as weeding a garden – you’re gently plucking out the unwanted bits to reveal the beauty beneath. As you remove the bloodline and blood meat, use your fingers or the blunt edge of your knife to gently pat the fillet and remove any remaining bits. This will leave you with a clean, pristine fillet ready for cooking.
Removing the Skin and Bloodline
This is the final hurdle to achieving perfectly filleted crappie. By now, you’ve navigated the intricate process of gutting and filleting your catch. But, there’s still a crucial step left: removing the skin and bloodline. Think of this step as the final flourish on a culinary masterpiece – it’s the difference between a good dish and a truly exceptional one.
Grasping the Skin and Making the Cut
Hold the fillet firmly, with the skin side facing up. You’ll notice the skin is slightly thicker and more opaque than the rest of the fillet. Identify the thin, white line that runs along the lateral line of the fish – this is the bloodline. To remove the skin, you’ll need to make a precise incision just above the bloodline. Think of this incision as a gentle, shallow arc that follows the natural curve of the fillet. A sharp, thin-bladed knife is essential here, as it will allow you to make a clean, seamless cut.
Peeling Away the Skin and Bloodline
Starting from the incision, gently pry the skin away from the fillet, working your way along the length of the fish. Be patient and deliberate in your movements – you’re not trying to rush this process. As you peel away the skin, you’ll notice the bloodline adhering to the skin; this is normal. Continue to peel until you’ve removed the skin and bloodline in one, intact piece. The resulting fillet should be smooth, opaque, and free of any dark meat or bloodlines. Take a moment to admire your handiwork – you’ve earned it!
Final Steps and Storage
The final stages of filleting a crappie require attention to detail to ensure the freshest possible fillets. You’ve come a long way, and with these final steps, you’ll be enjoying a delicious meal in no time.
Rinsing and Pat Drying the Fillets
After removing the skin and bloodline, give your fillets a gentle rinse under cold running water to remove any remaining scales or debris. This step is crucial in preventing any contamination and promoting food safety. Use your fingers or a soft-bristled brush to gently scrub away any stubborn scales or bits of skin.

Next, pat the fillets dry with a paper towel or clean cloth to remove excess moisture. This helps prevent bacterial growth and makes the fillets easier to store. Think of it like drying a freshly washed car – you want to remove as much moisture as possible to prevent water spots from forming.
Storing the Fillets for Freshness
Now that your fillets are clean and dry, it’s time to store them properly. You have a few options, depending on when you plan to cook your crappie:
- Short-term storage: Wrap the fillets tightly in plastic wrap or aluminum foil and store them in the refrigerator at a temperature of 40°F (4°C) or below. They’ll keep for up to a week.
- Long-term storage: Consider vacuum-sealing the fillets and freezing them at 0°F (-18°C) or below. Frozen fillets can be stored for up to six months. Simply thaw frozen fillets overnight in the refrigerator or thaw them quickly by submerging the sealed bag in cold water.
Remember to always label and date your stored fillets, so you know exactly what you’re working with and how long it’s been stored.


