Explore the top cheapest side imaging fish finders, learn about their , , and effective usage. Get answers to FAQs and make an informed decision for your fishing needs.
What is a Side Imaging Fish Finder?
How Side Imaging Technology Works
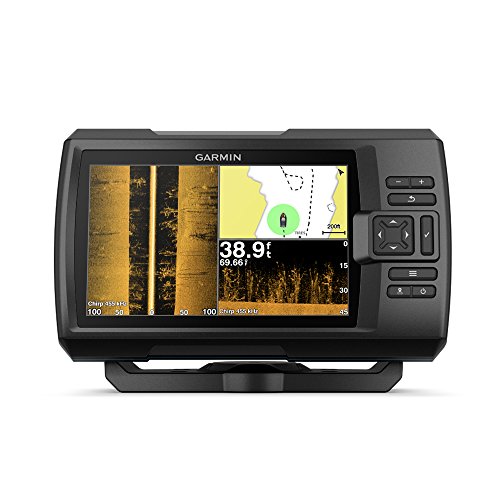
Side imaging fish finders are advanced electronic devices that use sonar technology to locate and visualize fish and underwater structures. Unlike traditional fish finders that only provide a single beam of sonar, side imaging fish finders use multiple beams to create detailed images of the underwater environment.
The technology works by emitting a series of high-frequency sound waves, or sonar signals, from the transducer mounted on the boat. These signals travel through the water and bounce off objects such as fish, rocks, and vegetation. The transducer then receives the echoes and sends them back to the fish finder, which processes the information and displays it on the screen.
The side imaging technology allows the fish finder to create a wide, panoramic view of the underwater landscape. It provides detailed images of the bottom structure, vegetation, and fish that may be hiding in the shadows. This enables anglers to accurately locate and target specific areas where fish are likely to be present.
Benefits of Using Side Imaging Fish Finders
Side imaging fish finders offer a range of for both amateur and professional anglers. Here are some key advantages of using these devices:

- Enhanced Fish Finding: Side imaging technology provides a clear and detailed view of the underwater environment, allowing anglers to locate fish more easily. The ability to see the fish’s position, size, and behavior helps increase the chances of a successful catch.
- Improved Navigation: Side imaging fish finders not only help find fish but also assist in navigating through unfamiliar waters. The detailed imaging allows for better understanding of the underwater terrain, including submerged structures and potential hazards.
- Time and Cost Savings: By accurately identifying fish-rich areas, anglers can avoid wasting time and resources fishing in unproductive spots. This increases efficiency and maximizes the chances of a successful fishing trip.
- Versatility: Side imaging fish finders can be used in various water conditions, including rivers, lakes, and oceans. They are equally effective in both shallow and deep waters, making them suitable for a wide range of fishing scenarios.
- Real-Time Data: Many side imaging fish finders offer real-time data updates, providing anglers with instant feedback and allowing them to make quick adjustments to their fishing strategies.
Overall, side imaging fish finders revolutionize the way anglers locate and target fish. With their advanced technology and user-friendly interfaces, these devices have become indispensable tools for any serious angler.
Factors to Consider When Choosing a Cheapest Side Imaging Fish Finder
When it comes to choosing a side imaging fish finder, there are several factors that you should consider. These factors will help you find the best option within your budget while ensuring that it meets your specific needs. Let’s take a closer look at some of the key factors to consider:
Price Range
The first factor to consider is your budget. Side imaging fish finders come in a range of prices, so it’s important to determine how much you’re willing to spend. Keep in mind that while cheaper options may be more affordable, they may not offer all the features and capabilities of higher-end models. Strike a balance between your budget and the features you require.
Display Size and Resolution
The display size and resolution of a side imaging fish finder play a crucial role in providing clear and detailed images of the underwater environment. A larger display allows for better visibility, especially in bright conditions or when viewing multiple screens simultaneously. Additionally, a higher resolution ensures sharper and more accurate imaging, enhancing your ability to identify fish and underwater structures.
Transducer Type
The transducer is a vital component of a side imaging fish finder as it sends and receives sonar signals. There are different types of transducers available, including transom mount, trolling motor mount, and through-hull mount. Each type has its own advantages and considerations, depending on your boat type and fishing preferences. Consider factors such as installation ease, performance, and durability when choosing the transducer type.
GPS and Mapping Features
Many side imaging fish finders come equipped with GPS and mapping features, which can greatly enhance your fishing experience. GPS allows you to mark waypoints, track your routes, and navigate accurately. Mapping features provide detailed charts and maps of the water bodies, highlighting underwater structures and contours. Consider whether these features are important to you and if they align with your fishing needs.
User-Friendly Interface
An intuitive and user-friendly interface is crucial for an enjoyable fishing experience. Look for a side imaging fish finder with a well-designed interface that is easy to navigate and understand. Consider factors such as menu layout, button placement, and touchscreen capability. A user-friendly interface will save you time and frustration, allowing you to focus more on fishing.
By carefully considering these factors, you can make an informed decision when choosing a side imaging fish finder that is not only affordable but also meets your specific fishing requirements. Remember to strike a balance between your budget and the features you need, ensuring that you have a reliable and effective tool to enhance your fishing adventures.
Top Cheapest Side Imaging Fish Finders in the Market
Model A
When it comes to finding an affordable side imaging fish finder, Model A is a top contender. This fish finder offers great value for its price, making it a popular choice among budget-conscious anglers. With its side imaging technology, Model A allows you to see a detailed view of the underwater environment, including structures, vegetation, and of course, fish.
Some key features of Model A include a clear and high-resolution display, which makes it easy to read and interpret the sonar readings. The transducer type is also important to consider, as it determines the quality of the images produced. Model A comes with a high-quality transducer that ensures accurate and detailed imaging.

One of the advantages of Model A is its user-friendly interface. Even if you’re new to using fish finders, you’ll find it easy to navigate through the menus and settings. This makes it a great option for beginners or those who prefer a straightforward device.
Model B
If you’re looking for a reliable yet affordable side imaging fish finder, Model B is worth considering. This model offers a range of features that make it a great tool for both novice and experienced anglers. With its side imaging technology, Model B provides a clear and detailed view of the underwater world, helping you locate fish and underwater structures with ease.
One of the standout features of Model B is its display size and resolution. The larger display allows for better visibility and makes it easier to analyze the sonar readings. Additionally, the high resolution ensures that the images are sharp and clear, providing you with accurate information about what lies beneath the surface.
When it comes to transducer type, Model B excels in delivering accurate and detailed imaging. The transducer used in this fish finder is designed to capture clear images, allowing you to see fish and structures with precision. This makes it a valuable tool for anglers who want to maximize their chances of success on the water.

Model C
For those on a tight budget, Model C offers an affordable option without compromising on performance. This side imaging fish finder is packed with features that make it a great tool for any angler looking to explore underwater environments. With its side imaging technology, Model C provides a detailed view of the underwater world, helping you locate fish and structures effectively.
One of the key factors to consider when choosing a fish finder is the GPS and mapping features. Model C comes equipped with a reliable GPS system, allowing you to mark your favorite fishing spots and navigate with ease. Additionally, the mapping features help you create detailed maps of the areas you fish, providing valuable information for future trips.
Model C also boasts a user-friendly interface, making it easy to navigate through the different settings and menus. Whether you’re a beginner or an experienced angler, you’ll find this fish finder intuitive and easy to use.
Model D
Model D is another top contender when it comes to affordable side imaging fish finders. This model offers a range of features that make it a reliable and efficient tool for anglers of all levels. With its side imaging technology, Model D provides a clear and detailed view of the underwater world, helping you locate fish and underwater structures effortlessly.
One of the key features of Model D is its price range. This fish finder offers excellent value for its cost, making it a budget-friendly option. Despite its affordability, Model D does not compromise on quality and performance.

When considering a fish finder, it’s essential to look at the transducer type. Model D is equipped with a high-quality transducer that captures accurate and detailed images. This ensures that you can see fish and structures with clarity, giving you an advantage when it comes to locating your target.
Pros and Cons of Cheapest Side Imaging Fish Finders
When considering purchasing a side imaging fish finder, it’s important to weigh the pros and cons to make an informed decision. Let’s explore the advantages and limitations of using the cheapest side imaging fish finders.
Advantages of Using Cheapest Side Imaging Fish Finders
- Enhanced Fish Detection: One of the key advantages of side imaging fish finders is their ability to provide a detailed view of the underwater environment. With the cheapest side imaging models, you can still benefit from this advanced technology and easily locate fish, even in challenging conditions.
- Improved Accuracy: Side imaging fish finders offer high-resolution imaging, allowing you to accurately identify fish species and distinguish them from other objects. This can greatly enhance your fishing experience and increase your chances of success, even with a more affordable option.
- Wide Coverage Area: Side imaging technology provides a wider coverage area compared to traditional fish finders. Cheaper side imaging fish finders may have slightly smaller coverage areas than higher-end models, but they still offer a significant advantage over other types of fish finders.
- User-Friendly Interface: Many inexpensive side imaging fish finders are designed with user-friendly interfaces, making them accessible to both beginner and experienced anglers. The intuitive controls and menus allow for easy navigation and customization, ensuring a smooth and enjoyable fishing experience.
Limitations of Cheapest Side Imaging Fish Finders
- Reduced Depth Capability: Cheaper side imaging fish finders may have limitations when it comes to scanning depth. While they can still provide accurate imaging in shallower waters, they may not perform as well in deeper depths. It’s essential to consider the depth range you typically fish in before choosing a model.
- Lower Image Quality: The image quality of cheaper side imaging fish finders may not be as crisp and detailed as that of higher-end models. While they can still provide valuable information, it’s important to manage your expectations regarding image clarity.
- Limited Advanced Features: Cheaper side imaging fish finders may lack some of the advanced features found in more expensive models. These features could include GPS mapping, advanced sonar technologies, or networking capabilities. However, if you prioritize cost-effectiveness over advanced features, the cheapest options can still fulfill your basic fishing needs.
- Potential for False Readings: In certain situations, cheaper side imaging fish finders may be more prone to false readings and interference. This can be caused by factors such as water conditions, electrical interference, or incorrect installation. It’s crucial to carefully follow the manufacturer’s instructions and troubleshoot any potential issues to minimize false readings.
How to Use a Side Imaging Fish Finder Effectively
Proper Installation and Placement of Transducer
Installing and placing the transducer correctly is crucial for maximizing the effectiveness of your side imaging fish finder. Here are some key points to keep in mind:
- Positioning the Transducer: The transducer should be mounted securely on the hull of your boat, preferably in a location where it will have a clear view of the water. Avoid mounting it too close to the motor or other objects that could cause interference.
- Transducer Orientation: Ensure that the transducer is positioned parallel to the water’s surface. This will help provide accurate readings and reduce the risk of signal distortion.
- Depth and Angle: Adjust the depth and angle of the transducer based on the water conditions and your fishing preferences. If you’re fishing in shallow water, you may want to position the transducer closer to the surface. Experiment with different angles to find the optimal position for maximum coverage.
- Secure Mounting: Use high-quality mounting hardware and follow the manufacturer’s instructions to securely mount the transducer. This will prevent any movement or vibration that could affect the accuracy of the readings.
Adjusting Settings for Maximum Performance
To get the most out of your side imaging fish finder, it’s important to understand and adjust the settings according to your specific needs. Here are some settings you can tweak for maximum performance:
- Sensitivity: Adjusting the sensitivity of the fish finder allows you to fine-tune the device to detect fish and underwater structures more effectively. Increase the sensitivity in areas with clear water or when fishing in deeper waters, and decrease it in areas with muddy or turbulent water.
- Color Palette: Most side imaging fish finders offer different color palettes to enhance the visibility of underwater objects. Experiment with different color options to find the one that provides the clearest and most detailed images for your specific fishing conditions.
- Depth Range: Adjusting the depth range setting allows you to focus on specific depths of the water column. If you’re targeting fish in shallow water, set the depth range accordingly to avoid cluttering the display with unnecessary information.
- Zoom: Utilize the zoom feature to magnify specific areas of interest, such as potential fish targets or underwater structures. This can help you get a closer look and make more accurate assessments.
Interpreting Side Imaging Sonar Readings
Interpreting the side imaging sonar readings is an essential skill for effectively using your fish finder. Here are some tips to help you make sense of the information displayed:
- Understanding the Display: The side imaging sonar display typically shows a split screen, with the left side representing the left side of your boat and the right side representing the right side. Familiarize yourself with the display layout to easily identify underwater objects and fish targets.
- Identifying Fish Targets: Fish targets will appear as arches or dots on the display. The size and shape of the arches can provide information about the size and movement of the fish. Experiment with different settings to enhance the visibility of fish targets.
- Recognizing Bottom Structures: Side imaging sonar can provide detailed images of underwater structures such as rocks, vegetation, and submerged logs. Learn to identify these structures on the display to locate potential fishing spots.
- Using GPS Coordinates: Many side imaging fish finders come with GPS functionality, allowing you to mark and save specific locations. Take advantage of this feature to mark productive fishing spots or areas of interest for future reference.
Remember, practice makes perfect when it comes to interpreting side imaging sonar readings. Spend time on the water experimenting with different settings and learning to recognize the patterns and signals displayed on your fish finder.
Maintenance Tips for Cheapest Side Imaging Fish Finders
Cleaning and Care Instructions
Taking proper care of your side imaging fish finder is crucial to ensure its longevity and optimal performance. Here are some cleaning and care instructions to help you keep your device in top condition:
- Gentle Cleaning: Use a soft, lint-free cloth to wipe the screen and body of the fish finder. Avoid using harsh chemicals or abrasive materials that may damage the device’s surface.
- Water Resistance: While most side imaging fish finders are designed to be water-resistant, it’s important to avoid submerging the device in water or exposing it to excessive moisture. Wipe off any water droplets immediately to prevent potential damage.
- Transducer Care: The transducer is a critical component of the fish finder. Ensure that it is securely attached to your boat or kayak and protected from impact or damage. Regularly inspect the transducer for any signs of wear or cracks and replace it if necessary.
- Storage: When not in use, store your side imaging fish finder in a dry and safe place. Keep it away from direct sunlight, extreme temperatures, and any potential sources of damage.
Regular Software Updates and Firmware Upgrades
To ensure that your side imaging fish finder operates at its best, it’s important to regularly check for software updates and firmware upgrades. These updates often include bug fixes, performance improvements, and new features that can enhance your fishing experience.
Here are a few tips for updating your device’s software:
- Check the Manufacturer’s Website: Visit the manufacturer’s website to find information about software updates and firmware upgrades specific to your fish finder model. Download the latest updates and follow the instructions provided to install them correctly.
- Connectivity: Some side imaging fish finders may require a computer or smartphone connection to download and install updates. Check if your device requires any specific cables or software to establish the connection.
- Backup Settings: Before installing any software updates or firmware upgrades, it’s a good practice to back up your device’s settings. This ensures that you can easily restore your preferred settings in case any changes occur during the update process.
Storage and Transportation Guidelines
Proper storage and transportation of your side imaging fish finder are essential to prevent damage and maintain its functionality. Consider the following guidelines:
- Secure Mounting: If you have a fixed fish finder installation on your boat, make sure it is securely mounted to prevent vibrations or movement during transportation. Use appropriate brackets, screws, or mounting accessories recommended by the manufacturer.
- Protective Cover: Invest in a protective cover or case for your fish finder to shield it from dust, dirt, and potential impacts during transportation. This will help safeguard the screen and other sensitive components.
- Avoid Extreme Temperatures: Extreme temperatures can affect the performance and longevity of your fish finder. Avoid leaving it exposed to direct sunlight or extreme cold for prolonged periods. If necessary, remove the device and store it in a temperature-controlled area.
- Consider Waterproof Bags: If you frequently transport your fish finder to different locations or use it on a kayak, consider using a waterproof bag to provide an additional layer of protection against water splashes and potential accidents.
By following these , you can ensure that your cheapest side imaging fish finder remains in optimal condition, allowing you to enjoy accurate fish detection and a seamless fishing experience.
Frequently Asked Questions about Cheapest Side Imaging Fish Finders
Can I Use a Cheapest Side Imaging Fish Finder for Ice Fishing?
Ice fishing is a popular activity during the winter months, and many anglers wonder if they can use a side imaging fish finder for this purpose. The good news is that some side imaging fish finders are designed specifically for ice fishing. These units are equipped with features that allow them to withstand the freezing temperatures and harsh conditions of the ice fishing environment. They often come with a special ice transducer that can be easily mounted on the ice or through a hole in the ice. These fish finders provide detailed imaging and sonar readings, allowing you to locate fish and underwater structures even under the ice. So, yes, you can definitely use a side imaging fish finder for ice fishing.
How Deep Can Cheapest Side Imaging Fish Finders Scan?
The depth range of cheapest side imaging fish finders can vary depending on the model and brand. However, most affordable side imaging fish finders are capable of scanning depths up to 100 feet or more. It’s important to note that the effective scanning depth may also depend on factors such as water clarity, bottom composition, and the power of the fish finder. In general, if you are fishing in shallow waters or smaller lakes, a cheaper side imaging fish finder should be sufficient. But if you plan to fish in deep waters or large bodies of water, you may want to consider investing in a more advanced and higher-priced model that offers greater scanning depth capabilities.
Are Cheapest Side Imaging Fish Finders Waterproof?
Yes, most cheapest side imaging fish finders are designed to be waterproof. They are built to withstand exposure to water and moisture, ensuring that they remain functional even in wet conditions. However, it’s important to differentiate between being waterproof and being submersible. While these fish finders are designed to handle splashes and light rain, they may not be fully submersible. Therefore, it’s essential to check the specifications of the specific model you are considering to ensure that it is suitable for your intended use. If you plan to use the fish finder in heavy rain or underwater, it’s advisable to choose a model that is explicitly labeled as “waterproof” or “submersible.”
Can I Mount a Cheapest Side Imaging Fish Finder on a Kayak?
Yes, you can mount a cheapest side imaging fish finder on a kayak. In fact, many anglers find side imaging fish finders to be extremely useful for kayak fishing. These fish finders can provide valuable information about the underwater landscape, helping you identify potential fishing spots and locate fish. When it comes to mounting a fish finder on a kayak, there are a few options available. You can use a dedicated kayak fish finder mount, which attaches securely to the kayak and provides a stable platform for the fish finder. Alternatively, you can use a universal mount or a DIY mounting solution, depending on your kayak’s design and your personal preferences. Just ensure that the fish finder is securely attached and easily accessible for optimal functionality while you’re out on the water.
Conclusion
The world of fishing has been revolutionized by the introduction of side imaging fish finders. These innovative devices use advanced sonar technology to provide anglers with a detailed picture of what lies beneath the water’s surface. From identifying fish and structures to mapping out the underwater terrain, side imaging fish finders have become an essential tool for both professional and recreational fishermen.
How Side Imaging Technology Works
Side imaging technology works by emitting high-frequency sound waves from a transducer, which then bounce off objects underwater and return to the device. The fish finder then interprets these echoes to create a detailed image of the underwater environment. This allows anglers to see fish, underwater structures, and even vegetation with incredible clarity and precision.
Benefits of Using Side Imaging Fish Finders
Using a side imaging fish finder offers numerous to anglers. These include:
- Increased Fishing Efficiency: Side imaging fish finders allow you to locate fish and structures quickly and accurately, saving you time and effort.
- Better Fish Targeting: With the ability to see fish in real-time, you can target specific species and increase your chances of a successful catch.
- Detailed Mapping: Side imaging fish finders provide detailed maps of the underwater terrain, helping you identify potential fishing hotspots and navigate unfamiliar waters.
- Improved Safety: By providing real-time information about submerged obstacles, side imaging fish finders enhance safety on the water, reducing the risk of accidents.
- Enhanced Fishing Experience: Seeing the underwater world come to life on your fish finder screen adds excitement and enjoyment to your fishing trips.
Factors to Consider When Choosing a Cheapest Side Imaging Fish Finder
When choosing a side imaging fish finder, there are several factors to consider to ensure you get the best value for your money. These factors include:
Price Range
Consider your budget and look for a side imaging fish finder that offers a balance between affordability and performance. It’s important to remember that while cheaper models may lack some advanced features, they can still provide reliable fish-finding capabilities.
Display Size and Resolution
A larger display with higher resolution will provide a clearer and more detailed image, making it easier to spot fish and underwater structures. However, keep in mind that a larger display may also come with a higher price tag.
Transducer Type
The transducer is a crucial component of a side imaging fish finder as it sends and receives the sonar signals. Look for a fish finder with a high-quality transducer that is compatible with your fishing needs and preferences.
GPS and Mapping Features
Having built-in GPS and mapping features can greatly enhance your fishing experience. These features allow you to mark waypoints, create routes, and navigate back to your favorite fishing spots with ease.
User-Friendly Interface
Ensure that the side imaging fish finder you choose has an intuitive and user-friendly interface. This will make it easier for you to navigate through different settings and functions, saving you time and frustration on the water.
Top Cheapest Side Imaging Fish Finders in the Market
If you’re looking for a side imaging fish finder that offers the best value for your money, here are some top options to consider:
Model A
- Affordable price without compromising on performance
- Clear and detailed side imaging sonar
- User-friendly interface with intuitive controls
- Built-in GPS for easy navigation
Model B
- Excellent display resolution for crisp imaging
- Wide coverage area for extensive fish-finding capabilities
- Advanced mapping features for enhanced navigation
- Durable construction for long-lasting use
Model C
- Budget-friendly option with reliable fish-finding capabilities
- Compact and portable design for easy transportation
- Adjustable settings for customized sonar readings
- Compatible with various fishing environments
Model D
- Affordable price with advanced features
- High-resolution display for detailed imaging
- Precise GPS and mapping functionalities
- User-friendly interface with intuitive controls
Pros and Cons of Cheapest Side Imaging Fish Finders
Like any technology, there are both advantages and limitations to using the cheapest side imaging fish finders. Let’s take a closer look at some of these:
Advantages of Using Cheapest Side Imaging Fish Finders
- Affordable option for anglers on a budget
- Reliable fish-finding capabilities for locating fish and structures
- Enhances fishing efficiency and success rates
- Provides detailed imaging and mapping of underwater terrain
- Improves safety on the water by identifying submerged obstacles
Limitations of Cheapest Side Imaging Fish Finders
- May lack some advanced features found in higher-priced models
- Display size and resolution may be smaller, affecting image clarity
- Transducer quality may not be as high, resulting in less accurate sonar readings
- Limited storage capacity for saving maps and waypoints
- May have a shorter battery life compared to more expensive models
How to Use a Side Imaging Fish Finder Effectively
To make the most out of your side imaging fish finder, follow these tips for effective usage:
Proper Installation and Placement of Transducer
- Install the transducer according to the manufacturer’s instructions for optimal performance.
- Ensure the transducer is placed in a location that provides a clear and unobstructed view of the water.
Adjusting Settings for Maximum Performance
- Familiarize yourself with the different settings and adjust them according to the fishing conditions.
- Experiment with sensitivity, range, and frequency settings to achieve the best sonar readings.
Interpreting Side Imaging Sonar Readings
- Learn to interpret the side imaging sonar readings to identify fish, structures, and underwater features.
- Look for fish arches, vegetation, and changes in bottom composition to pinpoint potential fishing spots.
Maintenance Tips for Cheapest Side Imaging Fish Finders
To ensure the longevity and optimal performance of your side imaging fish finder, follow these :
Cleaning and Care Instructions
- Regularly clean the screen and transducer to remove any dirt, debris, or water spots.
- Store the fish finder in a dry and secure location when not in use to prevent damage.
Regular Software Updates and Firmware Upgrades
- Check for software updates and firmware upgrades provided by the manufacturer.
- Keeping your fish finder’s software up to date will ensure you have access to the latest features and improvements.
Storage and Transportation Guidelines
- When storing or transporting your fish finder, use a protective case or cover to prevent any damage.
- Avoid exposing the fish finder to extreme temperatures or prolonged sunlight, as it can affect its performance.
Frequently Asked Questions about Cheapest Side Imaging Fish Finders
Here are answers to some common questions about the cheapest side imaging fish finders:
Can I Use a Cheapest Side Imaging Fish Finder for Ice Fishing?
Yes, you can use a side imaging fish finder for ice fishing. However, ensure that the device is designed to withstand freezing temperatures and has ice fishing-specific features.
How Deep Can Cheapest Side Imaging Fish Finders Scan?
The scanning depth of a side imaging fish finder depends on various factors, including water conditions and transducer power. Cheaper models typically have a scanning depth of up to 300 feet, but more expensive models can reach depths of over 1,000 feet.
Are Cheapest Side Imaging Fish Finders Waterproof?
Yes, most side imaging fish finders, including the cheapest options, are designed to be waterproof. However, it’s essential to check the manufacturer’s specifications to ensure the device has the necessary waterproof rating for your fishing needs.
Can I Mount a Cheapest Side Imaging Fish Finder on a Kayak?
Yes, you can mount a side imaging fish finder on a kayak. Look for kayak-specific mounting options or consider using a portable mounting system that can be easily attached and removed.
In conclusion, side imaging fish finders have revolutionized the way anglers locate fish and navigate underwater terrain. By considering factors such as price range, display size, transducer type, GPS features, and user-friendly interfaces, you can choose a side imaging fish finder that suits your needs and budget. The top cheapest side imaging fish finders in the market offer reliable performance and advanced features at an affordable price. While there are pros and cons to using these fish finders, with proper installation, adjustment of settings, and interpretation of sonar readings, you can effectively utilize this technology to enhance your fishing experience. Regular maintenance, such as cleaning and firmware updates, will ensure the longevity and optimal performance of your fish finder. Finally, addressing frequently asked questions provides additional clarity for anglers considering the use of a side imaging fish finder.


