Get started with fishing by setting up a basic fishing line setup. Learn how to choose the right fishing line, hooks, and knots for a successful fishing trip.
Choosing the Right Fishing Line
When it comes to choosing the right fishing line, it’s like selecting the perfect tool for the job. You need something that will help you land the big catch, but also withstand the forces of nature. With so many options available, it can be overwhelming, but fear not! Let’s dive into the world of fishing lines and explore the differences between monofilament, fluorocarbon, and braided lines.
Monofilament vs. Fluorocarbon vs. Braided Lines
Imagine three superheroes, each with unique powers. Monofilament lines are like the classic, dependable hero. They’re affordable, easy to knot, and have a certain “give” that helps with shock absorption. Fluorocarbon lines are like the stealthy ninja – nearly invisible underwater, with a higher density that allows them to sink faster. Braided lines, on the other hand, are the high-tech wizards, boasting incredible strength, minimal stretch, and a thin diameter.
Line Strength and Pound Test Ratings
But what about line strength? Think of it like a weightlifter’s max bench press. A line’s pound test rating represents the maximum weight it can withstand before breaking. For beginners, a 10-15 lb test line is a good starting point. However, if you’re targeting larger fish or fishing in rough waters, you may need a heavier test line. Remember, it’s better to err on the side of caution – you don’t want your line snapping under pressure!
Line Color and Visibility Considerations
Ever wondered why fishing lines come in various colors? It’s not just about aesthetics! Line color can affect its visibility underwater. Darker lines like black or purple are less visible in murky waters, while clearer lines like blue or green are better suited for clearer waters. Some lines even have specialized coatings to reduce visibility. When choosing a line color, consider the water conditions and the type of fishing you’ll be doing.
By considering these factors, you’ll be well on your way to selecting the perfect fishing line for your next adventure.
Selecting the Proper Hooks
Hooks are a critical component of your fishing line setup, and choosing the right one can make all the difference between a successful catch and a disappointing day on the water. With so many types of hooks available, it’s essential to understand the characteristics of each to make an informed decision.
Hook Types: Bait Holder, Egg, and Bass Hooks
When it comes to hook types, there are several options available, each with its unique features and benefits. Bait holder hooks, as the name suggests, are designed to hold bait in place, ensuring that it remains attractive to fish. Egg hooks, on the other hand, are typically used for fishing with salmon eggs, corn, or other small baits. Bass hooks, as the name implies, are specifically designed for targeting bass and other large game fish.
Imagine you’re trying to solve a puzzle; the right hook type is the missing piece that completes the fishing setup puzzle. Using the wrong hook type can lead to lost fish, damaged gear, and a whole lot of frustration.
Hook Sizes and Corresponding Fish Species
Hook sizes are measured in terms of their width, which is typically indicated by a number (e.g., 1, 2, 4, 6, etc.). The smaller the number, the larger the hook. When selecting a hook size, it’s crucial to consider the type of fish you’re targeting. For example:
* Smaller hooks ( sizes 6 to 10) are suitable for panfish, trout, and small bass.
* Medium-sized hooks (sizes 2 to 4) are ideal for larger bass, walleye, and pike.
* Larger hooks (sizes 1 to 2/0) are best for targeting large game fish like muskie, northern pike, and large bass.

Think of hook sizes like a key fitting into a lock – the right size hook ensures a secure hold, while the wrong size can result in a lost fish.
Hooks and Line Material Compatibility
When choosing a hook, it’s essential to consider the type of line material you’re using. Monofilament and fluorocarbon lines are more prone to abrasion than braided lines, which means they require more gentle handling. Hooks with a rough or abrasive finish can damage these lines, leading to weak points and potential break-offs. Bass and bait holder hooks often feature a smoother finish, making them a better match for monofilament and fluorocarbon lines. Egg hooks, on the other hand, typically have a more aggressive finish, making them better suited for braided lines.
Setting Up the Basic Fishing Rig
Setting up a basic fishing rig may seem daunting, especially for beginners. But fear not, dear angler! With a little know-how and some quality tackle, you’ll be reeling in those fish in no time.
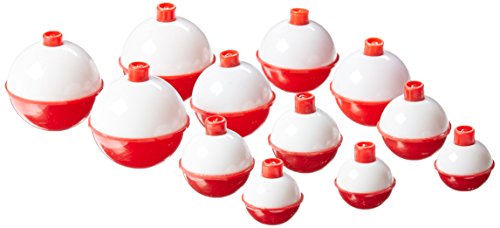
Sinkers: Weights, Bobbers, and Swivels Explained
You’ve got your line, your hooks, and your lures – now it’s time to add some weight to the equation. Sinkers, also known as weights, are designed to get your bait down to the bottom of the water or to a specific depth. There are several types of sinkers to choose from, including:
- Split shot: Small, spherical weights that can be clipped onto your line
- Egg sinkers: Oval-shaped weights with a hole in the center for your line
- Pyramid sinkers: Heavy, pyramid-shaped weights for fishing in strong currents
- Bobbers: Also known as floats, these devices suspend your bait at a predetermined depth
Think of sinkers like the wheels on your car – they help you get where you want to go, but they’re not the engine that drives the whole operation. In this case, the engine is your swivel. A swivel is a small metal device that connects your line to your lure or hook. It’s crucial for preventing line twist, which can lead to knots and tangles.

Choosing the Right Swivel and Leader Length
So, how do you choose the right swivel for your setup? It all comes down to the type of fishing you’re doing and the size of your tackle. As a general rule, a good swivel should be able to withstand the weight of your lure or bait, as well as the strength of the fish you’re trying to catch.
When it comes to leader length, the key is to find a balance between giving your lure or bait enough room to move naturally and avoiding tangles. A good starting point is a leader length of around 1-2 times the length of your rod.
Attaching Lures and Baits: Snaps, Clips, and Knots
You’ve got your swivel attached, now it’s time to add your lure or bait. There are a few ways to do this, depending on the type of fishing you’re doing and the type of tackle you’re using. Some popular methods include:
- Snaps: Small metal clips that allow you to quickly switch out lures
- Clips: Similar to snaps, but often used for attaching multiple lures or baits
- Knots: Tying your lure or bait directly to your line using a knot
Remember, the key to a successful fishing trip is all about attention to detail. Take your time, and make sure everything is securely attached before casting off.
Fishing Line Knots and Connections
When it comes to securing your catch, the humble knot is the unsung hero of fishing. A well-tied knot can be the difference between landing a trophy fish and watching it swim away with your gear. In this section, we’ll delve into the world of fishing line knots and connections, exploring the best practices for tying secure knots, connecting different line types, and avoiding common mistakes that can cost you a catch.

Tying a Secure Knot: The Improved Clinch Knot
So, what makes a good knot, and how do you tie one? The Improved Clinch Knot is a tried-and-true favorite among anglers, and for good reason. This versatile knot can be used to connect your line to a swivel, lure, or hook, and its slim profile reduces the risk of snagging or catching on underwater debris. To tie an Improved Clinch Knot, follow these steps:
- Thread the tag end of the line through the eye of the swivel, lure, or hook.
- Make five turns with the tag end around the standing part of the line.
- Pass the tag end through the loop you just created in step 2.
- Moisten the knot and pull it tight to secure it.
- Trim the excess tag end, and you’re ready to fish!
The Improved Clinch Knot is a reliable choice, but it’s not infallible. Make sure to test your knot before casting, and never assume it’s secure without giving it a good tug.
Connecting Monofilament to Fluorocarbon or Braid
When combining different line types, it’s essential to understand the unique properties of each material. Monofilament, fluorocarbon, and braid lines have distinct strengths, weaknesses, and characteristics that affect how they interact with each other. Here are some tips for connecting these line types:
- When joining monofilament to fluorocarbon or braid, use a Blood Knot or a Uni Knot to maintain line strength.
- Fluorocarbon leaders can be used to connect monofilament or braid to a lure or hook, as they provide a nearly invisible connection.
- Braid lines can be more challenging to connect due to their loose weave, but a Palomar Knot or a loop-to-loop connection can provide a secure bond.
Remember, the key to a successful line connection is to choose the right knot for the job and to test it thoroughly before casting.
Common Line Knot Mistakes to Avoid
We’ve all been there – you’re excited to hit the water, and in your haste, you rush the knot-tying process. Unfortunately, a poorly tied knot can lead to disappointment, frustration, and a lost catch. Here are some common knot mistakes to avoid:
- Rushing the knot: Take your time when tying a knot. A poorly tied knot can be disastrous.
- Insufficient turns: Make sure to complete the recommended number of turns when tying a knot. Cutting corners can lead to a weakened connection.
- Not testing the knot: Always tug on the knot gently to ensure it’s secure before casting.
By following these guidelines and avoiding common mistakes, you’ll be well on your way to landing more fish and enjoying a successful fishing trip.
Important Line Care and Maintenance
Proper line care and maintenance are crucial to ensure your fishing line lasts longer and performs optimally. A well-maintained line can make all the difference between a successful catch and a disappointing trip.
Storing and Handling Fishing Line to Prevent Damage
Imagine your fishing line as a delicate fabric that can easily get tangled, knotted, or damaged if not handled properly. When storing your line, it’s essential to keep it away from direct sunlight, moisture, and extreme temperatures. You can store your line in a cool, dry place, such as a tackle box or a line storage container.
When handling your line, avoid touching it excessively, as the oils from your skin can weaken the material over time. If you must touch your line, make sure your hands are clean and dry. It’s also a good idea to handle your line with a soft cloth or gloves to prevent abrasion.
When winding your line onto your reel, apply gentle pressure to prevent twisting or kinking. You should also avoid over-tightening your line, as this can cause damage to the reel or the line itself.
Cleaning and Conditioning Fishing Line for Longevity
Cleaning and conditioning your fishing line regularly can significantly extend its lifespan. Regular cleaning helps remove dirt, grime, and other substances that can weaken your line. You can clean your line using a soft cloth and a mild detergent. Gently wipe down the line, working from one end to the other. Avoid using harsh chemicals or abrasive materials, as these can damage your line.
After cleaning, apply a line conditioner or a silicone-based lubricant to protect your line from the elements. This will help maintain its flexibility and prevent it from becoming brittle. Conditioning your line also helps reduce tangles and knots, making it easier to cast and reel in your line.
By following these simple care and maintenance tips, you can enjoy a longer-lasting, high-performing fishing line that will help you catch more fish and make your fishing trips more enjoyable.


